Wecome To RVs and OHVs

This blog is all about RVs (recreational vehicles) and OHVs (Off Highway Vehicles), camping, sailing, and survival
and how they work together to provide wholesome family fun and great learning opportunities.
Many posts are intended to familiarize novice campers and RVers with RV systems and basic camping and survival
skills. But even experienced RVers and campers will enjoy the anecdotes and may even benefit from a new
perspective. Comments, questions, and suggestions are encouraged. The organization is pretty much by date of publication because of how blogspot works. Please use the SEARCH option below to find what you are looking for.

Saturday, January 5, 2013

A Few Useful Plants for Wilderness Survival

Identifying useful plants can be a valuable survival skill.  While many plants are edible, some are not and in some cases, even a teaspoonful can be enough to kill you.  For example, wild onions are edible but the death camas, which grows in the same areas, appears almost identical -- but it doesn't have the onion odor -- lives up to its name and can kill you.   No doubt you have seen "Survivorman" Les Stroud find edible plants in most of his episodes.  Be aware that he has had the benefit of specialized training by local experts to know what to look for.  Memorizing a manual of exotic jungle plants isn't going to do you any good in a North American desert or forest.  In addition to being a possible source of emergency food, some plants have other uses.  You need to look into what grows where you live and camp and how you can use it.

DISCLAIMER:  I am not a doctor, pharmacist, or an herbalogist.   The suggestions given here are gleaned and summarized from public documents and personal experience.  I have tried to identify plants that are readily available in many places (at least in the Western United States) that might be useful in a survival situation and that don't require sophisticated processing.

I have lived in the Western United States all my life so I'm pretty familiar with some of the indigenous flora. Large parts of the West are covered with sagebrush deserts and juniper trees.  At higher elevations you'll find various kinds of pines, firs, cedar, aspen, and maple.  Willows grow along many lakes and streams.  All of these have potential in a survival situation.

Pine nuts are a safe and flavorful source of nutrition.  They can sometimes be difficult to harvest as they are locked in pine cones.  They can usually be harvested in September and October and sometimes later in the year.   Find a tree with lots of pine cones and shake it or use a long stick to knock down mature cones.  If the cones are already at least partially open, you may be able to simply pull out the nuts.  If they aren't open, you may need to lay the cone on a bed of coals to make it open up.   If the cone has been properly pollinated and the tree has gotten enough water, the nuts should be large and edible.  Lacking proper pollination or water they will be dried up, rotten, and inedible.  Pine nuts are an excellent source of protein so they can be especially desirable if you are unable to obtain meat or fish in the wilderness.  Pine and spruce needles contain significant amounts of Vitamin C and can be used to make a flavorful tea or chewed to freshen your breath.

Sagebrush is common in many of the semi-arid parts of the Western United States.  The wood lights easily and burns quickly, even when green.   The aromatic smoke from burning sagebrush is an effective anti-bacterial agent so it makes a good fuel for a "smoke shower".  Sagebrush leaves can be made into a poultice for disinfecting wounds.  When made into a tisane (a kind of herbal tea), it was used by Native Americans to treat internal bleeding, such as battle wounds and childbirth, but note that it is somewhat toxic to the human liver and digestive system and so it should be used sparingly and with caution.  Breathing sagebrush smoke is said to help relieve headaches.  An infusion (made by seeping leaves in water or alcohol) can be used to disinfect hands, walls and equipment.  The leaves were sometimes chewed to relieve stomach gas but may taste somewhat bitter.

Junipers, which also inhabit much of the same territory as sagebrush, have a number of uses. Juniper berries are used to give gin its characteristic flavor, but you'll probably not be making a lot of gin in survival mode.   More practically, Juniper is used for digestion problems including upset stomach, intestinal gas (flatulence), heartburn, bloating, and loss of appetite, as well as gastrointestinal (GI) infections and intestinal worms.  It is also used to treat urinary tract infections (UTIs) and kidney and bladder stones.  Other uses include treating snakebite, diabetes, and cancer.  Juniper is also traditionally used to treat a broad range of health conditions, including bronchitis, colds, fungal infections, hemorrhoids, gynecological diseases, and wounds.   It is reported to be effective as an anti-bacterial and anti-fungal agent.

Willows, poplars, and aspens all contain salicyn which is closely related to aspirin.   Aspirin is acetylsalicylic acid, a synthetic version of salicyn.  Salicyn is found in the inner bark of willows, poplars, and aspen trees.   Its use is recorded as far back as 400 B.C. and was extensively used among Native American tribes to treat headaches, other body pains, fever and to reduce inflammation.  To use it, extract the inner bark from twigs.  You can chew the bark or make it into a tea.  Anyone that is allergic to aspirin should avoid using salicyn.  I have personally tried using willow bark as an aspirin substitute and found it quite effective.  The inner bark of aspen can also be eaten, although it is often somewhat bitter. The white powder found on the outer bark of aspen makes an effective sunscreen and also contains a significant amount of a naturally occurring yeast that can be used in making bread, pancakes, etc.  Aspen buds can be soaked in olive oil to make a soothing salve for skin irritations and abrasions.  Aspen twigs can be chewed into fibers to make a good wilderness toothbrush.   It is said to be good for both the spindle and the fire board for the fire-bow or bow-drill method of fire starting.  The wood, being soft, even grained, and tasteless, works well for utensils, such as bowls, spoons, cups, and anytime you need a lightweight, moderately strong wood.  If you use aspen for making bowls, make sure the piece you select is completely dry and without checks, or it may crack after you have begun carving.  A bowl may be burned-out by placing a coal on top of the blank piece of wood, and blowing until the surrounding wood begins to burn.  After a time, scrape out this char, and continue burning.  When you have attained the shape and depth you desire, sand the bowl down with a piece of sandstone, and finish it with mineral oil.  Alternately, a good crooked knife makes short work of the soft, even-grained wood.   Many thanks to Paul J. Van Horn, in his Internet article, The Quaking Aspen.  As a firewood, it is on the low side in the amount of heat it produces but is easy to cut and burn.  It tends to be sparky, so loading your fire up with aspen wood and sleeping near it is NOT advised.   Aspen or birch bark from a large, mature trees (preferably dead trees) can also be used as shingles for your emergency shelter.   A nice feature if you get rained on in a survival situation.


                                            photo of wild onion


Wild onions, (shown above) are edible and can add flavor to survival foods, but, as mentioned above, the death camas (shown below) is easily confused with the wild onion.  Both have similar looking leaves and bulbs and are often found in the same places even growing side by side, but the death camas does not have an onion smell.  If you harvest wild onions, be sure to smell each one before eating it.  It it doesn't smell like an onion, get rid of it or feed it to your enemies.  Don't eat the bulb or the stem (leaves) of death camas.   As the name implies, it can be deadly.   Below is a picture of a death camas.

                                         Ranchers warned to be on the lookout for death camas | TSLN.com

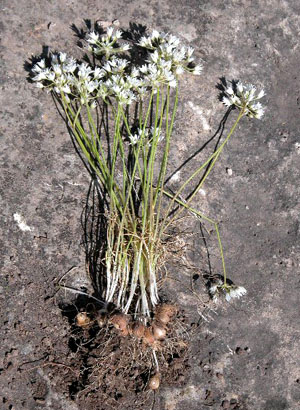
As you can see, it  looks a lot like wild onion.  Always check for the onion smell so you don't mistake death camas for wild onions.


Blueberries and blackberries grow wild in some parts of the Pacific Northwest.  These are healthy, tasty, and safe to eat and a real treat if you an find them.

Other wild berries are also often thought of as wonderful survival treats, but some are poisonous. There are many different species depending on the climate so be sure to check the Internet or a good reference book specific to where you go on activities.  For a good primer on identifying and using wild berries see this article in Mother Earth News.

Wild grapes come in both edible and toxic versions.  Being able to sort them out is beyond the scope of this post.  You may need a good horticulture book about plants indigenous to your areas of concern to know which category yours falls into, if they even grow there.

Cattails are often found in wetlands, along lakes and streams.  It is sometimes known as the "supermarket of the swamp".   Mature cattail seed clusters are brown and fuzzy and about the size of a large frankfurter, growing on a long stem about the size of an arrow.  If they are mature and dry they are an excellent source of tinder for starting fires.   This soft fluffy stuff can also be use as padding in dressings or to pad splints or to add insulation to clothing or bedding.  You can make flour from the starch in the roots.  In a survival situation you may just want to eat the starch raw.  Other parts are also edible, depending on the time of year.   The fronds or long leaves can be used as cordage.  I've heard that different parts of a cattail can taste like cucumber (the young shoots) or corn (young spikes).  The seeded "hotdogs" make excellent torches, especially if dipped in tree sap and are said to be better at keeping bugs away than citronella.  Breaking them down into fluff makes excellent tinder to help you get your fire going. The jelly-like sap from sprouts in the spring is good for treating insect bites, scratches, and burns.   There are few, if any, poisonous plants that can be mistaken for cattails.   If you have cattails available, you shouldn't starve to death, but you may still need some protein, so consider catching some mammals, fish, or bugs (yccch!) to round out your diet.  If insects are your only option, roasting them might make them a little more palatable.


Milkweed actually describes a whole family of related plants.  It is characterized by a milky, sticky white sap.  The fluffy milkweed filaments from the follicles are hollow and coated with wax, and have good insulation qualities.   They are sometimes used commercially to create hypoallergenic fill for pillows.  This fluff is also a good source of tinder for starting fires too.  The sap is somewhat sweet and was used by Native Americans but it also contains small amounts of a toxin which can be harmful if you consume 10% or more of your body weight (good luck collecting and consuming that much!).   As light and fluffy as this stuff is, you'd have to eat a HUGE amount of it before you have anything to worry about. BTW, milkweed is also a critical habitat for monarch butterflies.

Birch trees inhabit many temperate climates and are mostly found in northern latitudes of North America.  Birch bark was used by Native Americans to make canoes.  In certain species the bark lends itself to being made into paper.  Birch tar is an effective glue.   Tea made from birch leaves is an effective diuretic, which can be helpful in flushing toxins from the body but also speeds dehydration.   Birch burns well without popping even when frozen or freshly hewn.   Birch bark can be soaked until moist in water, and then formed into a cast for a broken arm.  The inner bark can be safely ingested.  Pieces of birch bark can be used as shingles to help weatherproof an emergency shelter. Birch leaves can be boiled to make a cleaning solution.

Oleander is described as being poisonous to humans but there were only 3 reported deaths in the United States over 20 years -- all self-administered.  Oleander is an evergreen shrub with long narrow green leaves.  Flowers may be white or pink. It grows in tropical and subtropical areas.  You aren't likely to find it in mountainous regions or deserts, but it is sometimes planted there by people as decorative plants.  The State of California uses it a lot as median foliage on freeways.  The blossoms may be red,  pink, or white.  There are some obscure medicinal uses for Oleander covering a wide range of afflictions, but none have been scientifically documented.  Skin contact does not appear to be a problem but eating the leaves or drinking tea made from them would make you sick, causing nausea, vomiting, diahrrea and erratic heartbeat.  Some more severe results occur when it affects the central nervous system, producing symptoms such as drowsiness, tremors or shaking of the muscles, seizures, collapse, and even coma that can lead to death.  Macerated leaves of oleander have been applied topically for treatment of dermatitis, loss of hair, superficial tumors and syphilis.  A decoction of oleander leaves has been used for the treatment of gingivitis and as a nose drop for children.   Do not use oleander for cooking, either as a fuel or in contact with food such as a stirring stick.  Oleander may have flowers ranging from nearly red like those in the photo below to pink to white.
                                                        
                                                           Image result for oleander plant pictures                                   

Russian olive trees are not indigenous to the United States although they are now quite widespread and are often considered an invasive species since they have a tendency to take over.  Russian olives are often found along streams or near other sources of water in the Western United States. They have a narrow, silvery leaf and dark red bark -- and nasty thorns!  The thorns can be used as sewing awls and fish hooks.  You might even tie a large thorn onto a stick to make a spear for small game. The fruit is edible when fully ripe but quite astringent if eaten raw when not ripe.  It is used mostly to flavor soups.  Each fruit contains a single large seed which is also edible but quite fibrous. The fruit is dry, sweet, and mealy.  Oil from the fruits has been used with syrup for the treatment of bronchial infections and the juice of the flowers is used to treat malignant fevers.  The fruit is a good source of vitamins A, C, and E; also flavanoids.   It is high in fatty acids, which is unusual for any fruit.
                                                        
                                                       Image result for russian olive tree pictures
Prickly pear cactus is often found in arid or semi-arid regions. The fruit or cholla is edible, but you must first thoroughly remove the all hair-like spines or suffer great discomfort. In Mexican folk medicine, its pulp and juice have been used to treat numerous maladies, such as wounds and inflammations of the digestive and urinary tracts. The gel-like sap of prickly pears might be useful as a hair conditioner. The broad, flat, rounded "leaves" can also be eaten if properly prepared. Remove all the spines and cut away the edges, then peel back the skin. The inside can be consumed cooked or raw.

                                                                Image result for prickly pear cactus pictures

Sego lilies grow about 6 - 18" tall and have beautiful white flowers with a yellow and purple (or magneta) centers. They are native to a number of Western states and are often found in the same ecosystems as junipers and sagebrush. Sego lily bulbs were roasted, boiled or made into a porridge by Native Americans and were also used as a food source by the Mormon pioneers in Utah. It is the state flower in Utah.

                                                        Image result for sego lily pictures

Indian paintbrush is commonly found in Western America from Alaska to the Andes. It is characterized by spikey, bright red blossoms which give it its' name. The flowers were eaten by Native Americans as a condiment with other fresh greens. Selenimum is concentrated in the leaves and stems, making them quite toxic so eat the flowers only, save the leaves for your enemies.  Indian paintbrush has similar health benefits to consuming garlic if only the flowers are eaten in small amounts and in moderation. Feed the leaves and stems to your deadly enemies only!

                                                                     Image result for indian paintbrush pictures

Dandelions are usually thought of as a pesky weed, but they can have many beneficial uses and they are plentiful in many places. The leaves have been used to treat liver problems and high blood pressure. Be aware it is a diuretic and will increase urine output. This may help flush out some unwanted substances but may also speed dehydration. Fresh or dried leaves is a mild appetite stimulant and settle an upset stomach. Some, but not all, studies have found dandelion helped normalize blood sugar. Dandelion greens can be added to or eaten as a salad. Martha Stewart was reported to have had inmates collect dandelion greens from the exercise yard to add to her salads in prison. Dandelion roots can be roasted and ground up to make a wilderness substitute for coffee. The dandelion flower has antioxidant properties and may help improve the immune system.


                                                                         Image result for dandelion pictures
                                                                

Marigold circling a vegetable garden is said to keep rabbits out. In your medicine kit, it is a particularly good treatment for cuts, scrapes, bruises, insect bites and minor wounds. It is also antifungal. You can apply a poultice made from leaves and blossoms directly to wounds or boil them to make a tea and apply that to wounds. Mash some fresh marigolds and apply them to insect bites to take out the sting.  Marigolds may be yellow (as shown below) or orange.

                                                                 Image result for marigold flower pictures

Honey, though not a plant, is a naturally occurring substance that has many wonderful wilderness and emergency survival uses. Besides being a tasty, high energy treat, it can be used to ease sore throats and as an antiseptic on wounds. It is said to prevent infection and speed healing. Collecting honey from wild bee hives can be tricky and you're very likely to get stung, so if you're allergic to bees, don't try it. One technique is to smoke out the bees before opening the hive. Hang onto a couple of packets of honey from a restaurant or fast food place to tuck in your survival kit.  Though honey may crystallize, it never spoils.  Archeologists have found viable (edible) honey in Egyptian tombs 3000 years old!  While honey is safe for adults, doctors advise against giving it to children under 1 year old whose immune systems may not be developed yet.  Even though honey has many antibacterial properties, there are indications it can lead to botulism in young children.  So don't coat the baby's pacifier with honey!


Spearmint is often used as a stomach soother as well as a flavoring. Chew a few mint leaves to freshen your breath too. Spearmint tea is calming, refreshing and soothing. Could be helpful reducing stress in an emergency situation.

                                                           Image result for spearmint plant pictures

Peppermint contains menthol, a natural analgesic, good for aching joints and muscles. Menthol is the active ingredient in many sports cremes. Peppermint is also claimed to have healing properties. Crush leaves and apply them to aching joints and muscles. Like spearmint, peppermint leaves can be chewed to freshen breath. 
                                                          Image result for peppermint plant pictures
                                                                                                            
                   
Mullein is native to Europe and Asia, but has been transplanted to America too. It is also known as the "velvet plant" and "Desert Charmin" for its soft fuzzy leaves. And yes, the name "Desert Charmin" implies one of its handy uses as toilet paper in a survival situation.  However, be aware that many plants with fuzzy leaves are not so friendly and are likely to cause an allergic reaction, so exercise caution.  Stinging nettle is fuzzy and you definitely don't want to even touch it, let alone apply it to sensitive body parts!
                                                        Image result for Mullein plant pictures
                                                      

Forage on!

Safe Fueling

Safe fueling is a factor for RVers, OHVers, and tent campers.  Even if you're a tent camper and don't have any kind of RV, you will likely be using a motor vehicle to get to your campground. Almost all RVs use propane to fuel stoves, furnaces, hot water heaters, and refrigerators. Motorhomes also have gasoline or diesel tanks for engine fuel.  Travel trailers may have a gasoline tank for powering an on board generator and a propane tank for appliances (and sometimes the generator).

It should go without saying to NEVER smoke or use any kind of ignition source around fuel pumps or fuel tanks or when transferring fuel from one container to another. But some people still need a reminder. The brightly displayed warning signs are certainly preferable to suffering the natural consequences of igniting volatile vapors!   Note:  warnings against using a cell phone at many gas stations are not supported by the evidence.  You are far more likely to ignite fumes from a static discharge from sliding off the seat than from using your cell phone.

Always turn off the engine and all propane appliances before fueling either a propane tank or fuel tank. Sparks from a vehicle or generator exhaust could ignite fumes. Pilot lights or electronic ignition of propane appliances could also ignite fumes. The main shutoff valve on motorhome propane tanks must be closed prior to filling the tank. Trailers and campers usually have portable propane thanks. These should be removed from the vehicle and placed on the ground for filling. The attendant should insist that you remove them before filling. The same is true for the portable tanks for your BBQ. Always be careful when moving a propane tank. The steel construction of the tank could cause a spark from movement on pavement. Since excess propane is vented to release pressure in the hose before the hose is disconnected, there could be volatile fumes near the tank. Many propane filling stations have protective steel cylinders they put the tanks in while filling, just in case there is a defect in the tank that might let it explode was pressure increases.

Some motorhomes have dual fuel tanks. This nicely extends the distance between fuel stops, but increases the time it takes to fill the tank(s). Sometimes the fillers for the two tanks are located on opposite sides of the coach, requiring you to back up and switch sides of the pump to fill the second tank. If you haven't hung up the hose and stopped the pump be sure to have someone hold the nozzle. DO NOT lay it down on the ground. Fuel remaining in the hose will leak out and create a hazard. Most gas pumps have a purchase limit when using a credit or debit card. With today's high, fluctuating fuel prices, this limit is often inadequate to fill even one large motorhome fuel tank, let alone two. You may find it more convenient to plan fuel stops more frequently with the goal of staying within the purchase limits instead of running one or both tanks nearly empty before stopping for fuel. A large motorhome with 100 gallon fuel capacity can take around $400 of fuel to fill empty tanks at today's prices in remote areas.

It should go without saying that you should extinguish any smoking materials, open flames, or other possible sources of ignition. Yes, I said it before above but it is worth repeating. Fuel vapors are VERY volatile and can be ignited easily. There is even a common myth that cell phones can cause gas station fires. According to snopes.com this is FALSE. However, I suspect texting or chatting on a cell phone might cause a distraction that allows another hazardous situation to occur, possibly leading to a fuel spill or other accident. Even with the automatic shutoff on most gas pumps you should monitor filling to avoid overfill and spillage. If there is a spill, flush it with water or report it to the station attendant.

Static electricity is a real threat when fueling. See Static Electricity At The Gas Pump for more information. When you first exit your vehicle, any charge is usually dissipated as you use the pump card reader and pick up the nozzle. However, if you get back into the car, you may generate a new charge that can be dangerous. To be on the safe side, avoid getting back into the vehicle until your transaction is complete and always touch the metal cabinet of the pump before handling the nozzle.  Gas station fires once thought to be caused by cell phones have been proven to have been ignited by static electricity.

If you are filling a gas can, take it out of your vehicle and place it on the ground before filling it. Static electricity can build up from the act of fueling if the can is left in the vehicle.  Also, keep the nozzle in contact with the container while filling.  Touch the metal frame of the pump or a metal overhead canopy before starting fueling to dissipate any static buildup in your body before starting to pump fuel.

Cell phone use during fueling is often discouraged. The claim that cell phones cause gas stations fires is an unfounded myth, but there are still valid reasons to avoid using a cell phone while fueling. Even though there is no evidence that cell phones themselves can generate a spark sufficient it ignite fuel fumes, the static electricity from re-entering your car to get your phone or put it back can trigger a fire. Using your cell phone, either talking or texting, can also be distracting to the point that you may not notice overfilling or other dangerous conditions.  Sometimes drivers get back into their cars to retrieve their cell phones and that can create a static electric charge which can trigger an explosion.

Gas lanterns, portable heaters, and camp stoves all require fuel. If they use white gas you will need to exercise extra caution when filling them. Make sure the appliance is on a stable surface where it won't easily fall tip over.  Make sure you are in a well ventilated area so fumes won't accumulate.  Clean up any spilled fuel immediately.  The tanks are usually under pressure so be careful to go slowly removing the cap so the pressure can escape without spraying fuel on you or anything around you. Use an appropriately sized funnel to pour fuel into the tank and take care not to overfill and spill. Filling lanterns can be especially dangerous because they are often still hot when they run out of fuel and campers are anxious to get them going again.  Opening the pressure cap on a hot lantern can result in serious injuries from the resulting fire and/or explosion.  Camp stoves usually have a removable gas tank so you can take it a safe distance from the hot burners to refuel.  Propane appliances are a little easier to swap tanks on, but some gas may escape when you remove the old tank, so work in an open or well ventilated area away from flames or other sources of ignition.  It may seem obvious and indeed it should be, but be sure to shut off the burner before changing cylinders.

Gas stations have an emergency shut off switch that should always be clearly labeled and in plain sight.  It can be used to shut down all the pumps if there is a fire.  It is a good idea to make it practice to locate the shut off switch before you start pumping.  That way, if there is an emergency, you won't be wasting time searching for it.

Fire is our friend when it is safely controlled in an appliance or a campfire. It is definitely NOT friendly in a gas station!  Proper fueling procedures will avoid spills and fires and ensure your safety.

Safety First!

Fuel Storage

Fuel storage is an issue for RVers, OHVers, and campers.  In order to be prepared for spontaneous outings and to use our RVs or camping supplies in a disaster situation, we need to store some fuel at home, assuming we can do it legally and safely.  There are some jurisdictions that place limitations on the types and amounts as well as methods of storage for fuel.  Most suburban residences routinely store a can of gas for lawnmowers and propane for their BBQs.  Most homeowners probably aren't storing it properly.

Keeping the fuel tanks on your RV full in storage is usually a recommended practice.   There are seldom any prohibitions on parking a vehicle with a full gas tank.  While a full gas tank represents a greater source of combustible materials if the vehicle catches fire, keeping it full reduces the chances of accidental ignition. It is the fumes that burn, not the liquid gasoline.  I have seen demonstrations of dropping match into a 1-gallon tin can filled to the top with gasoline and the match just goes out.   Do that with a 1-gallon tin with only about 1 inch of gasoline in the bottom and you'll get an explosive ignition!   Mythbusters did a demonstration blowing up cars with different levels of fuel.  Which one made the biggest, baddest, boom?  The one with an empty gas tank!  Regularly inspect your fuel tank and fuel lines to be sure there aren't any leaks.   This applies to the propane tank on all RVs, stoves, and BBQs as well as motor fuel tanks on motorhomes, tow vehicles, watercraft, and OHVs.

Safe storage of portable fuel containers is governed by both common sense and government regulations.   OSHA has very specific rules for the storage of flammable liquids, including paints and cleaning solvents as well as fuel.  Many cities have additional regulations regarding home storage of fuels so check with your own city before you begin hoarding propane cylinders or gas cans against a potential emergency.  Store flammable materials and corrosive materials in separate areas outside of your home.  And, no, an attached garage is not considered "outside your home".  This is where the average homeowner runs afoul of both fuel safety and (often) the law.  Fuel should be stored in a metal building, like a shed, separated from the structure containing your living quarters.  Keep in mind that gasoline does go bad over time.  Exposing it to hot temperatures in storage speeds evaporation and deterioration.

NEVER store fuel in anything but an approved container.  Gasoline and other petroleum products may react with many types of plastic which could cause an unsafe condition.   To see an accelerated demonstration of this, pour a little gasoline in a styrofoam cup.   Make sure you do this where the spill won't kill your grass or endanger structures because the cup will quickly melt and release the gasoline.  Other plastics, like milk and juice jugs may react more slowly, but the only containers you can be sure won't react are those approved for fuels.  There are different colored containers for gasoline (red) and diesel (yellow).  Water jugs are usually blue or green.   This will help you keep track of the proper fuels for different pieces of equipment and help you avoid mixing fuels.   Putting gasoline into a diesel engine or diesel fuel into a gasoline engine can cause serious problems.  Plastic gas cans designed for off-road use are usually square, making them more stable than standard "jerry" cans.  They can be equipped with a hose to make a convenient spout for filling your OHV.   For even more convenience and to prevent spills, you can screw a 2" long 1/2" plastic pipe nipple into the end of the hose and add a PVC pipe cap.  If you store mixed gas for 2-stroke engines like those found on OHVs, outboard motors, chain saws, and some garden equipment, label it with the fuel ratio so you will know which devices it can be used in.  Using mixture that is too rich will foul plugs; using a mixture that is too lean can cause the engine to seize.  And no engine runs well on the wrong mixture.

NEVER store portable fuel containers inside your RV or your residence.  Even storing them in your garage, as many people do, isn't a good idea.  For real safety, store them in a separate metal shed or cabinet outside.  This applies to spare tanks for your BBQ and to the 1 lb cylinders used to fuel camping equipment.  When you need to transport portable cylinders in your RV on camping trips, place them in an outside cabinet away from any source of heat or ignition.   You may need to crawl under your motorhome and inspect exhaust pipes from the engine and from the generator to make sure they don't come dangerously close to a cabinet where you plan to store fuel.  Make sure any tanks you carry are closed and not leaking.  There is no manual shut-off valve on 1-lb propane cylinders.  hey are designed to seal automatically when they are removed from appliances.   To be sure, sniff the top of the canister and/or spray it with a little soapy water to make sure it sealed correctly . There will usually be a little odor for a minute or so after disconnecting, but it should quickly go away.   Test it with soapy water to be sure.   If it is leaking, dispose of it properly and DO NOT put it back in your RV cabinet . Leaking fumes could accumulate until they reach the flash point, at which time any spark would cause an explosion!  If you have no place to dispose of it, leave it sitting outside until any sign of leakage is gone.  At that point either it has emptied or resealed itself and should no longer be dangerous.  Personally, I would mark such a container and dispose of it when I got home to avoid any future risk.   Or put it back into your stove, BBQ, or lantern, and use it up.  If you carry extra fuel for your RV or OHVs, carry in only in an approved container and keep it outside of your RV.   Gas can racks can often be mounted on the rear bumper of a motorhome or travel trailer. If you carry fuel in an enclosed OHV trailer, which is a fairly common practice, make sure the cans are tightly closed and leave some ventilation in the trailer (windows and/or roof vents) so fumes from any spills or leaks from gas cans or vehicles that may happen will dissipate before they reach the flash point.

When filling gas cans at a filling station, always remove them from your vehicle and put them on the ground.  Leaving them in the back of a pickup truck, in a trailer, or in the racks on your bumper may allow static electricity to build up during fueling which could cause a fire or explosion.   While we're on the subject of fueling safety, it goes without saying you should not smoke.  There is also a common myth that cell phones can cause fires while fueling. According to snopes.com, this is FALSE.  There has never been any documented evidence to support this claim.  Other sources of ignition, mostly static electricity, have been found at all incidents where a fire occurred while a customer was using a cell phone.   Here are some additional detailed guidelines about filling gas cans: Fill Gas Cans Carefully.

Safety First!

Saturday, December 29, 2012

Survival Tools and Kits

What are the best survival tools?   Your best and most important tools are your brain, your attitude, your hands, and your knowledge but here are a list of physical items you should put in your survival kit and always carry with you when camping, hiking, horseback riding, or riding an OHV.  If you're going to the trouble to make and carry a survival kit, it might was well have some things that in it that are truly useful and convenient to use.   Just how often do you REALLY think a foot of fishing line and a couple of safety pins from the handle of one of those "Rambo" survival knives are going to be useful let alone adequate?  Survival kits range from tiny little pocket-sized kits that fit in an Altoids tin to suit-case sized monsters that include just about everything you can think of, including the kitchen sink.  For a survival kit to be realistic and useful, it must be something that is convenient to carry -- unless you intend it use it only for emergencies at home.  It will do you zero good on the trail if it is still on the shelf in the garage or under the bed at home!  Creating one that is right for you means constantly balancing and trading off completeness, convenience, cost, and portability. The best kit is one you will carry and that will have basic supplies and tools to expedite your survival. You might want a steamer trunk size survival kit at home to deal with a disaster situation, but for camping, hiking, etc., you'll probably want something that fits in a pocket or fanny pack. Commercial home disaster kits are good to have on the shelf in case of a neighborhood emergency. Most have 2-3 days of food and water, which makes them way too heavy and bulky to carry when camping.  For wilderness survival, you'll want to know how to find food and water in the wild and you'll want to stock your survival kit with essential tools for survival.

Basic survival tools:

    * Bic lighter
    * Flint and Steel
    * Multitool
    * Fixed blade knife
    * First aid kit
    * Signal whistle
    * Large plastic trash bag (orange preferred)

Some really good options to include:


    * Map and compass
    * GPS
    * LED flashlight
    * Twine or paracord
    * Duct tape
    * Survival blanket

Here is what I carry along with my tools in my tool bag when dirt biking:

    * LED Flashlight
    * Chemical light stick
    * Multitool
    * Survival Blanket
    * Bic lighter
    * Flint and steel
    * Signal whistle
    * A little duck tape wrapped around one of my tools
    *Wooden strike anywhere matches in a genuine waterproof match container

With careful planning and wise selections you can fit all the really critical survival tools in your pockets or in a small fanny pack or tuck into your OHV tool kit.  You want your survival kit to be something that is easy to carry and won't weigh you down.  Otherwise you'll be tempted to leave it behind and, according to Murphy's Law, you can bet the time you leave it behind will be the time you need it.

You can buy commercial survival kits or you can build your own from scratch.  Commercial kits are sometimes a good place to start and should have all the basics but you may need to augment them to meet your specific needs.  Building your own survival kits from scratch allows you to focus on what YOU need for YOUR circumstances and customize it so you can comfortably take it with you when you need to.

 
You should probably have at least 3 or 4 survival kits.  The smallest would be your personal trail kit you take with you hiking, horseback riding, dirt biking, etc.  Next would be an in camp kit, which would be larger and contain more first aid supplies and tools.  You should have a kit in every vehicle in case you encounter a disaster situation while on the road, going to or from you camp site or even to or from work or shopping.  You may want to have a personal survival kit at work depending on what emergency preparations your employer may or may not have.  You home kit should be a pretty complete kit, with plenty of first aid supplies, some emergency food and water, and tools you might need around the house or to support rescue efforts.

Remember, your brain is your most important survival tool.   If you "lose your head" in a survival situation you are probably going to lose your life. STOP is a useful acronym for what to do in survival mode.  It stands for Stop, Think, Observe, and Plan.  Panic kills more people in most disasters than the original event.  If you remember STOP it can help you prepare to survive.  Stop moving; don't run around wasting energy; Think about your situation, what are your resources and your immediate needs? Observe your surroundings and your urgent needs.  Are you or any of your companions injured?  Are you in danger of injury?  Can you find a safe place to stay?  Plan you activities.  Use the Rule of Threes to guide and prioritze your initial actions.  Then take appropriate action.

A lot is said in survival guides about fire starting methods. Most wilderness survival sources stress variations of rubbing two sticks together.  Knowing and practicing the skill is a good idea in case you get stranded unexpectedly without any preparations or supplies, but always keeping a few survival essentials with you will save you a lot of grief.  As I often say, the only way I want to start a fire rubbing two sticks together is if one of them is a match!  For the most convenience, carry a Bic lighter.  As a backup, carry a magnesium-flint and steel fire starter . If you're putting things in a survival kit, might as well have something that is safe and easy to use.  A Bic lighter takes up about as much space as a dozen wooden matches but will give you hundreds of lights instead of twelve. Even when it runs out of fuel, you can still use it as a little flint and steel.   If you're going to stock a survival kit, why not stock it with things that work and you can actually use?  Knowing how to start a fire with flint and steel is a good skill to have.   You might luck out and find stones that create sparks in a survival situation if you don't have your trusty survival kit with you.  I pick up Bic style lighters at Dollar Tree, 3 in a package so it is economical to carry one in my fanny pack, a couple spares in my motorcycle trailer and in my motorhome, and a stash in my survival supplies.  One advantage to a magnesium flint and steel fire starter is the magnesium will burn even when it is wet.

Multitool versus knife.  If you only have room for one, I would opt for the multitool.  Having a handy pair of pliers is useful for many survival tasks, ranging from removing cactus splines from your flesh to sewing tough hides for clothing or shelter.  You might even need pliers to help stitch up your own wounds.  Having a good fixed-blade knife is always a good idea if you have room for it.   In fact, moset survival experts say that is the best knife to carry.  The folding blade on your multitool is a pretty good substitute for many tasks, but is not as safe nor as sturdy as a good hunting knife.  Those big 'Rambo' style survival knives look cool and seem to have lots of neat stuff, but in a real survival situation will be less useful than a good hunting knife.  Carving is a far more common survival task than hacking or chopping and the handful of little so-called survival items in the handle are probably not going to be very useful.

Home made survival knives.  I came across a survival web site that describes how to make inexpensive survival knives from Sawzall blades. You can shape them to your design and add handles of your choice.   Start with a "demolition" blade and you'll have a really sturdy knife that will cut just about anything.  If you buy the blades in a bulk pack you can get them for under $1.00 each.  You'll pay $2.00-$3.00 apiece if you buy them individually.  Either way, they're a lot cheaper than store-bought survival knives, but it will take some grinding and filing plus making a handle to turn them into usable knives.   How big a knife do you need?  Most survival experts will advise you to carry about a 4" fixed blade knife.  You will do a lot more cutting and carving than hacking in a survival situation.  A nice hunting knife usually fits the bill.

First aid kit.  Like the old American Express ad, "don't leave home without it".  A minor wound can turn into a life-threatening situation if not properly treated.  A little moleskin to prevent blisters or a few bandaids to cover minor wounds will deliver a lot of comfort, reduce additional injuries, and help you keep going.   For the most complete kits, look for those designed for hunters.   Then supplement them with OTC pain killers and other useful comfort supplies like antacids and anti-diarrheal tablets. And don't forget to bring along your prescription meds if you depend on them!

A large plastic trash bag can serve a multitude of uses in a survival situation.  It can be used as a rain poncho, a sleeping bag, and to make a waterproof roof for your shelter.  It can be used to collect moisture from plants or to build a solar still to reclaim waste water.   The orange bags like those used by highway crews are the best choice since they can also be used as a signal for rescuers but an ordinary black contractor trash bag will suffice and you might even use it to heat water for bathing.  Clear plastic sheeting or bags is nice for building solar stills or collecting moisture from plants so you can see what's going on inside.  Even  plastic grocery bags can be used to collect moisture from plants. 

Being able to make cordage from materials on hand is an excellent survival skill, but having ready made cordage in the form of twine or paracord, can save you a lot of time and effort.  Do you have any idea how to obtain or make cordage in a wilderness survival scenario?   Here are some ideas: tree bark, reeds, weeds, long grass, sinews.  If you have vehicle you may be able to strip wiring or upholstery from it to use as cordage.  Binders twine is inexpensive and sturdy and has many diverse uses in camp and in survival mode.  Paracord is extremely strong.  You will see it sold as "paracord bracelets" which makes it easy to carry where ever you go.  Paracord can be wrapped around knife handles as a convenient place to carry it and give you a little extra grip.

Duct tape.  If you've ever seen the TV show MacGuyver, you know how versatile duct tape is.   A whole roll is pretty large and heavy to carry around with you.   Cut a 2-3' length and wrap it around a pencil, your Bic lighter, or the handle of one of your tools.   Duct tape is often called "duck tape". Turns out this is more than a punny mis-pronounciation of the name . It was the name originally used by the Army when they developed it to seal ammo boxes.  In consisted of strips of canvas duck plus an adhesive.  Duct tape will stick to just about any clean, dry surface. Turns out duct tape will stick to just about anything but ducts. That is because by the time we get around to trying to repair ducts, they're very dusty.  The tape sticks really well to the dust, but the dust doesn't stick to the duct.  Duct tape has a myriad of uses in camp or in a survival situation, ranging from tent and clothing repairs to bandages.  I've even seen reports of it even being used to make sun-slits as an emergency alternative to sunglasses by climbers on Mt Everest!  I roll a couple feet of duct tape around a screwdriver blade in my OHV fanny pack.

Training and practice are essential.  Book or online learning, or even classroom instruction is better than nothing, but to really be confident in your own abilities and be able to put them to use in an emergency takes practice.   Knowing how to start a fire with flint and steel is a good thing, but until you've actually tried it you won't know how hard and fast to strike the steel against the flint to create sparks or how to prepare satisfactory tinder or how close to get your sparks to the tinder to actually get it to work.  The flint often comes from the factory with a protective coating you must scrape way before you'll get useable sparks.  You also need to practice turning that little bit of smoldering tinder into flames and get it into your fire before it goes out.  Be sure to plan ahead so you aren't fumbling around and watch your little ember go cold while you try figure out how to get it into your fire. Remember those monsters under your bed or in your closet when you were a kid?   Well, they'll come back and bring their bigger, scarier friends when you're alone in a strange place in the dark.   Fire helps dispel unrealistic fears.

Tool up!

Friday, December 28, 2012

Survival Fires

Few will argue that fire building is one of the most essential survival skills.   Fire will keep you warm and prevent hypothermia when it is cold.   It will purify your drinking water and sterilize medical tools.   It will cook your food and kill dangerous germs and parasites that might be lurking in wild game.   It will entertain you and lift your spirits and make you more comfortable.  It will help keep wild animals away.  It will serve as a bright signal at night or a smokey column in the day to help alert rescuers to your location.

When we think of survival fires, we are usually thinking about wilderness survival.  But you may need to build a survival fire in your own back yard during an extended emergency situation.  You may need it mostly for cooking but might also need it for warmth or drying clothing or bedding. You probably won't need to build a signal fire in your back yard.  Some jurisdictions prohibit backyard fires but in most cases cooking fires are allowed and during an extended emergency rules are likely to be somewhat relaxed.

Given the importance of fire, wouldn't it be a good idea to be able to quickly build a fire in a survival situation?  You may see many survival "experts" tout old traditional, even stone-age, methods of making a fire as essential skills (mostly variations of rubbing two sticks together).  While these are probably good to have as last ditch back up emergency skills in case you get stranded unexpectedly without any survival supplies, you can take simple steps to ensure you will be able to quickly make a fire in an emergency.  The only way I want to start fire by rubbing two sticks together is if one of them is a match!   Forget about "waterproofing" matches.  DIY waterproofing can often seal in moisture rather than keeping it out.   Each match is only good for one use and when they're gone, you're back to rubbing two sticks together.   Any time you're headed out into the wilds where survival might come up, carry a Bic lighter.   A lighter is about the same weight and takes up about the same space as a dozen wooden matches -- and will light hundreds or even thousands of times.  When it runs out of fuel it may still be useful as a spark generator.  Along that line, a really handy and light weight fire starter is a flint and steel.  You can tuck them in your pack or pocket and always have a ready source of ignition at your fingertips.  Some include magnesium sticks you can shave so you can even light a fire in wet conditions.

Here is a link to a good tutorial on 9 Ways To Start A Fire Without Matches.   Note that a primary theme is practice, Practice, PRACTICE!  All the book-learning in the world isn't going to do you much good if you can't make it work, especially if you're cold and wet and REALLY need a fire NOW!   To be safe, know which methods are easiest and which ones work in wet weather -- and which ones YOU can actually do!

One of the most unusual ways I've seen someone start a survival fire was using a clear plastic bag filled with his own urine as a lens to focus sunlight. The technique would probably also work with clear water, but it got the job done, without wasting any precious water.   One more example of making use of whatever resources you have in a survival situation.

Flick your Bic!  A Bic style lighter should be one of your primary survival tools.   Even when the fuel runs out, it is still an effective flint and steel that can create a spark large enough to ignite well-prepared tinder -- until the flint wears out.  It is small, light weight, and very durable.  It is highly resistant to water and somewhat resistant to wind.  Lighters will withstand surprisingly hard impacts. I wouldn't recommend deliberately testing them with a rock or a hammer, but they will probably stand up well to most of the abuse they'll receive in pocket or pack.  I have often touted flint and steel as a basic survival tool, but I would strongly urge you to carry a lighter as your primary fire-making tool -- and flint and steel as a backup.   A lighter will only last so long before the fuel runs out or the flint is used up.

Of course you can use matches to start your fire -- if you have them.  Strike anywhere wooden matches are my preferred matches for camping and survival.  The Strike on box version isn't as versatile but may be a little safer if there are small children around so they may be good in your home survival kit.  Paper or "safety" matches aren't as durable as wooden matches and can only be struck on the special strip on the cover.  However, in an emergency situation, you might be able to double your supply of matches by splitting paper matches. I've tried it, and it isn't easy.   I've seen Les Stroud do it on an episode of Survivorman.  As he said, it is always good to conserve your resources in a survival situation.  Paper matches have the advantage of being small and easy to carry.  A book of matches is roughly the size of an old Eisenhower silver dollar.   If you choose to carry paper matches, put them in a sealed plastic bag to avoid getting them wet.  They won't work at all when they are wet!

As a backup fire starter, carry a magnesium flint and steel fire starter.   You can start a fire with one of these even when it is wet.   Shave some of the magnesium to make small pile and strike a spark into the pile with the flint and steel.  Magnesium is the same stuff used in old-fashioned flash bulbs and will burn bright and hot, even when it is wet.  A typical flint and steel fire starter will give you thousands of lights.  Practice using your flint and steel to routinely start your campfire so you will be comfortable with the technique and able to accomplish the task quickly in a survival situation.   Be aware that they often come from the factory with protective coatings that inhibit the spark, so it may take a few tries before you get a good spark from a new one.  The mass and durability of a flint and steel fire starter will ensure you enough to start lots of fires. The tiny little flint and abrasive wheel on lighters can wear out rather quickly, especially when the fuel runs out and you have to keep striking them over and over to use the sparks to ignite your fire. Having properly prepared tinder is essential for successfully starting a fire with flint and steel.   My preferred tinder is cotton balls.  Synthetic "cosmetic puffs" may look the same, but the sparks melt through the fibers instead of igniting them the way they do with 100% cotton.

Rubbing two sticks together is a last resort, one you may be stuck with if you have gone out unprepared or found yourself unexpectedly in survival mode, like Tom Hanks in the movie Castaway. The only way I want to start fire rubbing two sticks together is if one of them is a match!  However, you could unexpectedly find yourself in a situation where that is your only choice.   Anything you can do to give you a mechanical advantage will be helpful.  A bow drill can save you a lot of blisters. You'll need a flexible bow (usually a green stick); a hardwood base place, a softwood drill, and a bowstring.  The bowstring must be looped around the drill so it spins the drill as you "saw" the bow back and forth. Lacking the materials (or knowledge) to make a bow drill, a fire plow, is a simple alternative.   It works like this: start with a shallow grove in your base material and push the tip of your "plow" along the groove rapidly and repeatedly until it gets hot enough to begin to smoke and create an ember you can add to tinder to get your fire going. You can create enough friction to get a fire started by twirling a stick with your hands into a notch in your base plate, but it is very likely you'll blister your hands before you get fire. To minimize blistering, use a "drill" that is about 2' long. Start with your hands at the top and spin the "drill" between them by rubbing your hands back and forth as you press down on the drill. Your hands should move slowly down the drill as you spin it. You might prepare your hands for the proper movement with an exercise like the hand movements for the "itsy bitsy spider" children's game.  The downward movement keeps pressure between the drill and the base plate to generate friction and reduces the chances of blisters.  Wear gloves if you have them.   Stop now and then and slap your hands together to minimize getting blisters.  Your goal is NOT to prove how macho you are or how much pain you can endure.  It is to get a fire going with as little pain and waste of energy as possible.  For just about any variation of rubbing two sticks together, the base should be hardwood and the drill or plow should be softwood.  And always prepare fine, dry, easily ignitable tinder.   Quite frankly, before I would try rubbing two sticks together I would scout around for some rocks that might make a spark when banged together or struck with steel.  Hopefully you at least have your multi-tool or pocket knife with you.

The sun can be an excellent source of energy to light fires.  You just need a way of focusing the sunlight into a concentrated point to get enough heat to ignite your tinder.  The classic tool for this is a magnifying glass.  But since just about no one except Sherlock Holmes carries a magnifying glass around with them all the time, you may have to find an alternative.  Prescription eye glasses are sometimes strong enough to focus sunlight.   Sometimes a flashlight lens will work, but many of them are flat and don't concentrate the sunlight as needed.  A clear plastic bottle or bag filled with water (or urine) can also work.  You can also polish the bottom of an aluminum soda or beer can to make a parabolic reflector. The most publicized version of this used chocolate as the polishing agent, but you might do it with toothpaste or something else that contains a fine grain polishing agent. BTW, don't eat the chocolate after using it to polish the can.   Really clear ice might act as a lens, but most ice contains contaminates that scatter the light instead of focusing it.

A "Dakota fire pit" is a good way to build an efficient cooking fire.   Essentially it consists of a main fire pit about 1' across and 8-10" deep with a small tunnel from the bottom extending out a foot or so at 45 degrees on the upwind side to provide draft.   The pit concentrates the heat and the tunnel draws air from the bottom of the pit to fan the flames to create a very hot fire for cooking.  Because it is mostly beneath ground level, a Dakota fire pit is not very good for warming people around it.   However, if there is any need for concealment, as can happen in military situations, being below ground is a good thing since it reduces visibility that might reveal your position.  Here is a really good article on survival fires and especially the Dakota Fire pit.  If you use a Dakota Fire Pit for cooking and personal warmth you may need to have a separate signal fire ready to light when rescuers approach.

Signal fires may be one exception to building a larger fire than you need to keep you warm.   A larger fire will be easier for rescuers to see at night and will last longer should you fall asleep and can't keep feeding it.  However, large fires consume a lot of fuel and it will take a lot of your energy to keep feeding it.  It is a good idea to build up a large wood pile nearby when you need to feed a signal fire.  During daytime you will need green boughs or leaves to create extra smoke to make it easier for searchers to find you.

Another exception to the small fire rule is when it is raining or snowing.  In cases of heavy rain or snow, a large fire has a better chance of lasting out the storm.   Using a large punky log that will burn slowly or piling on a bunch of dried cattle dung are also ways to keep it smoldering, even in a downpour.  You may need a large fire to sustain you through the night too or as a signal fire.   For signaling, a large column of smoke is going to be more visible than a fire during the day, so have some green or damp branches or boughs or grass or big chuck of punky wood on hand to increase the smoke when needed.   Dried cow manure or "buffalo chips" is also works well to keep a smoldering fire.  Survivalists sometimes use this trick to transport fire from one site to another, by making a "fire bundle", wrapping the smoldering manure in green leaves or wet leather.

Urban survival, that is, being in a survival situation at home, may require fires for outdoor cooking or for emergency heat.  Certainly having a wood-burning fireplace or wood stove will give you useful options for keeping your family and your home warm in cold weather if utilities are out . If you don't have a supply of firewood you may have to resort to burning books or furniture.  Sacrificing that Chippenddale table would be a shame, but it sure beats freezing to death!   I enjoyed the scene in the movie, "The Day After Tomorrow" when the kids discovered there was a whole shelf of tax law books they could burn in the library fireplace instead of the classics to keep from freezing to death.  Good choice!  If you are in freezing weather, keeping the interior of your home above 32°F is critical to avoid pipes from freezing.  If utilities are out, you may need to cook outdoors.  An easy and often readily available solution is your portable back yard BBQ.  Built in BBQs or others connected to natural gas won't be working if the gas is shut off.  Do you have a place in your backyard where you can build a campfire?  If not, you might want to look into to making one so you have a place to build a cooking fire during any long term outages.  If you're at home you will probably have access to matches and/or lighters if you're at all prepared -- at least for a while.  If you don't have a significant cache you may run out before utilities are restored and may have to resort to flint and steel or rubbing two sticks together.

For long term survival, like you might experience in disaster situation, a "rocket stove" might be helpful.  They can be made from many readily available materials.  Search for "rocket stove plans" using your favorite Internet search engine.  Here are videos for making rocket stoves from several different kinds of materials.  A really easy and inexpensive version can be made from a #10 can and 4 soup cans . You can cook an entire meal for 4 people just a handful of twigs.

NEVER use open fires or even hibatchis, propane BBQs or camp stoves indoors.  Is isn't safe! There are special indoor propane heaters, like the "Buddy Heater", that you can use indoors safely, but units not rated for indoor use can be lethal.   Even if a stove doesn't put out toxic fumes, which most do, it will consume oxygen and, without proper ventilation, you will suffocate.  This has happened even to experienced campers who knew better but forgot when they set up a tent heater in a closed camper.

Survival fires serve many purposes.   Obvious uses are to keep you warm, purify water, and cook your food.  Keeping wild animals away is also a widely recognized function of fire.  Signalling is also a frequent and effective use of fire in a survival situation.   Less obvious, but more important than most people realize, is the psychological effect of fire on people in a survival situation. Remember, your attitude is the single most significant factor in your survival.   Fire can help you maintain a positive attitude.   Fire improves your comfort, safety, and state of mind.  Firelight helps us control the irrational fears that can set in when we're alone in the dark.  Remember the monsters in the closet or under the bed when you were a kid?  Figure they're about 10 times scarier (even to grownups) in a survival situation.   Every sound, every shadow, appears to be a threat.

Survival fire safety.   Just because you're in survival mode doesn't mean you can ignore fire safety rules.   In fact, it will behoove you to be especially careful with your survival fire.   The last thing you need is to turn your survival environment into a raging inferno.   It will no doubt attract lots of attention, but you are likely to perish long before any potential rescuers can get close enough to even know you're there.  Always follow standard fire safety rules.  Make sure you clear the ground of combustible materials for at least 5' around your fire as well as beneath it.  Make sure there are no overhanging branches that could catch fire.  Don't build a fire bigger than is necessary.  A small fire is usually adequate for cooking.   A medium sized fire may be needed for warmth, depending on weather conditions and the number of people you need to keep warm.  Large fires might be needed for signally, but making even signal fires too big only wastes fuel -- and your energy collecting it.  Be careful where you build your fire.   Even Suvivorman Les Stroud managed to set his driftwood shelter on fire in one episode.  Building fires in caves may seem practical, but the heat can cause the overhead rocks to expand and possible crack and fall on you, especially if you're in a small cave with a low ceiling.   Better to build the fire outside and let it warm you and the cave slowly and indirectly.  Sometimes building a fire in a cave might be the sensible thing to do.  Getting your fire out of the rain may be essential to keeping it going.  Having a fire in a cave can provide a warm environment for you and your companions.  Don't build a big fire that touches the walls or ceiling as that may increase the risk of cracking the rock around you.  Heat up some softball sized rocks to put in your bedding to help keep you warm at night.  They are especially comforting as foot warmers, but putting one in each arm pit and between your thighs might warm the rest of your body more quickly.  Just don't get them TOO hot!  You want to place them close to major arteries (like the femoral artery in your thighs) where they can warm the blood so it warms other parts of the body.  Holding warm stones in your hands for a while can help thaw frozen fingers and restore mobility you might need for survival tasks.  Another trick for warming cold hand is to clamp them in  your armpits or between your thighs.

Light up!