Wecome To RVs and OHVs

This blog is all about RVs (recreational vehicles) and OHVs (Off Highway Vehicles), camping, sailing, and survival
and how they work together to provide wholesome family fun and great learning opportunities.
Many posts are intended to familiarize novice campers and RVers with RV systems and basic camping and survival
skills. But even experienced RVers and campers will enjoy the anecdotes and may even benefit from a new
perspective. Comments, questions, and suggestions are encouraged. The organization is pretty much by date of publication because of how blogspot works. Please use the SEARCH option below to find what you are looking for.

Tuesday, March 30, 2021

Sail Ties

No, sail ties, are not novelty men's neck wear!

If you have a sailboat, you are going to need sail ties.  Sometimes sail ties refer to strings or ropes that actually tie the mainsail to the boom, but in this post I am talking about sail ties that are used to secure a sail when it is not in use.  They tie a lowered mainsail to the boom or can be simply tied around a loose jib to keep it from flapping or being blow overboard between uses.  Some sailors tie the jib to the lifeline or fore stay for extra security.   I also use mine to secure the rolled up sail for long term storage.  Sail ties can be useful for securing gear on other boats or in camp too.  1" nylon straps are typically rated at about 4,000 lbs so they are usually more than adequate to fasten loads on deck, in cargo areas, or on packs.   The first couple of outings in my sailboat I used bungee cords for sail ties and soon figured out real sail ties would be a much better option.  Sail ties are easier to use, hold more securely, and put less chaffing on the sail fabric than ropes or bungee cords.

A second possible use for sail ties is to secure the mainsail when reefing.  When the wind picks up you need less sail area.  Reefing consists of lowering the mainsail partway.  Sails built for reefing will have cringles (grommets) at one or more reefing points.    You can't really reef a sail without reefing points because there is no place to wrap a tie around the stacked sail without cringles.  You usually have a line already attached to the cringle nearest the mast that is used to pull the sail down for reefing but may need to thread sail ties through other cringles along the sail to secure it to the boom so it isn't flapping in the breeze or hanging down blocking your view or getting in your way.  Some reefing ties are permanently attached to the sail so they are always there when you need them but sometimes you may have to thread a tie through each cringle to secure the reef.  NOTE:  if you have to thread the ties through the cringles you may want to use an appropriate size rope that will be faster and easier to get through the small holes.  Nylon straps could be used for permanently attached reefing ties.

There are several options for what you can use for sail ties.  Some guys like to use bungee cords.  Some just use pieces of rope or paracord.  But one of the easiest I've used are nylon straps.  They have a loop sewn in one end so you can get a good hold on them to yank them tight.   The loop is usually sewn with a twist in the strap so it is easier to open to get your hand into it.  Bungee cords elasticity makes them useful in that they can be stretched around different parts of the sail and contract to hold it tight.  The only downside might be the hook chafing on the sail or gouging your hand or other parts of your body if they slip while you are trying to fasten or unfasten them.  They also tend to take off into the water when they unexpectedly come loose or you lose your grip on them when taking them off.  Nylon straps are easy to install and tighten, easy to tie, hold securely, and are easy to remove when the time comes.  And they don't put deep creases in the sail that might lead to chafing.

                                        Sewn Sails Sail Ties 48", 1" Polypropylene Webbing, Box Stitched - 6pc.Set, Assorted Colors

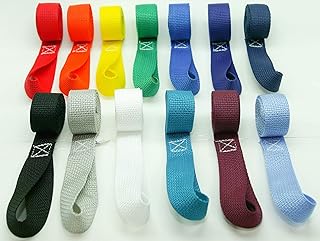
In the photo note the  box stitch used to form the loops and that the loops are twisted so they are easier to open when you use them.  Nylons straps are not usually used for reefing as they don't fit as well through the cringles as a light weight rope but you might use them in a pinch by folding or rolling them lengthwise to fit them through the cringle.  If you do  a lot of reefing you are going to want dedicated reefing ties to make the job easier. Nylon straps are amazingly strong.  1"wide nylon straps can usually hold up to 4,000 lbs, way more than you need to tie up a loose sail.

How many sail ties do you need?  I have seen recommendations ranging from using a tie every 2 ' to every 4' for the mainsail.  Personally I prefer using at least 1 sail tie every 2 feet.  On a mainsail with a 10' base or foot that would be about 6 sail ties, one at each end and one every 2' in between-- at 0, 2,4,6, 8, and 10 feet.  You might get away with just  using 5 sail ties -- tie one at each end, on in the middle, and the other two centered between the end and middle ties.  I use about the same number on my jib, which also has about a 9.5' base or foot.  The number of ties you need for reefing will depend upon the number of cringles in your sail.  If you have multiple reefing points (at different levels on the sail) you might want to have a set of reefing ties for each reefing point.  The ties needed for more than one reefing point will need to be successively longer for each level since there will be more sail to be tied off.  You might get away with having just one set but it would mean untying and retying previous reefs each time you reef again.  I like the idea of keeping the previous reefs tied off so I don't risk losing control of the already reefed portion of sail while retying more reefs.  Since reefing is used to reduce sail as wind increases, the last thing I want to have to deal with is extra sail flapping in the wind when trying to do the next reef.

How to tie a sail tie.  There isn't really any wrong way to tie sail ties as long as they hold in place and do their job -- and you can untie them when you need to.  However, there are some techniques that work better than others.  You want them to hold securely yet be easy to undo when you are ready to use the sail again so don't use permanent knots!   I like to use long ties so I can take a couple of loops around the sail to spread the load.  Then I grab the tail (end opposite the loop) and pull the end of  tail through the loop  so I can cinch it down tight, then tie off the loose end.  When I tie off the loose end I use another loop under the strap already around the sail, then put a second loop through the loop and cinch it down so I can get the whole thing loose by just pulling on the loose end.  Pull one loop under the tie next to the sail and then pull another loop through that loop, then cinch the whole knot down tightly.  That way I only need pull the loose end when it is time to undo the tie.  Here is a simple Youtube showing how to use a sail tie.  Sometimes time is critical and you will want to be able to get the sail back in service quickly.  Try avoid making small, tight knots as it they will difficult to untie and repeated use can weaken the strap.  You definitely don't want to tie knots so tight you have to cut them to get them off!  Such knots are sometimes called "knife knots", because you need a knife to undo them!  Knots will significantly weaken nylon straps so you don't want to tie knots in the loaded part of the strap.  You also want to avoid having to cut the knots since doing so you may risk cutting the sail!

Don't leave sail ties on the jib when you stow it away.  Open it up and flake it right so it lays flat then fold or roll it up for storage.  You can leave sail ties around the mainsail when it is left stowed on the boom in a sail cover but it too should be properly flaked when removed for storage.  You might use sail ties to keep properly rolled sails of any type from unrolling during storage and transport.  Sail bags are the preferred method of controlling loose sails, protecting them from sunlight, dirt, dust, and other elements during transport and storage but sail ties can keep them from becoming unruly during shorter spells not in active use and keep them snug in their bags.  What you don't want to do is use sail ties to gather up a loose sail and put it in storage without properly flaking it.

You may find other uses for our sail ties, like securing the extra coil of a halyard to the mast to keep it out of the way while underway.  No doubt you will find lots of other places a sail tie will come in handy.

You might want to have bunch of sail ties all the same color to coordinate with colors on your boat, but it is sometimes useful to have different colored sail ties of different lengths to make it easier to find the length you want for each position on the sail.  All ties a particular length should be the same color.  You might even use color mixing to help identify different sizes, for example, use red for 3' ties, orange for 4' ties, and yellow for 5' ties (orange is a mix of red and yellow so it belongs between them).  Continuing the pattern use green for 6' ties and blue for 7' or 8' ties since green is a mix of yellow and blue.  Then make any really long ones black or purple.  Color coded sail ties will make it easier to grab the one you want for each position on the sail.  Not long ago I replaced my all blue sail ties with colored ones and it really did make selecting the right one for easy position faster and easier.  It worked better whether I was pulling them out myself or asking my first mate to grab them for me.

Where to get sail ties?  You can buy sail ties at any marine supply store that caters to sailboats and online, including amazon.com.  They usually come in sets of 4 or 6.  You can usually choose a color to match your sail covers or coordinate with other colors on your boat.  I like to have a variety of lengths since I only need short ties near the clew of the sail and longer ones as I work up toward the mast and the amount of fabric increases.  Nylon strap ties can be easily cut to length using a hot knife, other sharp knife, or scissors.  If you don't have an electric hot knife to cut them you can use a lighter to melt the frizzy end to keep it from unraveling.  You might even find other uses for the cutoff ends.  We are replacing a worn out strap on a mainsail cover with one of ours.

You can make your own sail ties too.  You can purchase nylon strap on-line or at many fabric stores.    1" nylon strap is more than adequate for sail ties.  It usually is rated up to 4000 #  tensile strength.  Figure out how many ties you need of each length and add a foot extra for each tie.  The extra foot will be used to sew the loop.  When forming the loop, put a single twist in the strap instead of just laying it flat over on itself.  That will make opening the loop easier when you need to use it.  Use a box stitch about 1" long to fasten the end back on the strap using about 1' of strap to form a loop about 6" long.  Be sure to use thread that is designed for outdoor use and sun exposure.  Match the color of the thread to the color of each strap for the most professional looking results.  If you have multiple colored straps and want to save a couple of bucks (and time changing thread), you might sew them all with the same neutral color.  Dark thread on light straps or light thread on dark straps will be the most noticeable but with the small amount of stitching it probably won't make much difference.  All the ties in the commercial sample photo above used white thread.  You can find instructions along with kits for making sail ties at Sailrite.com.  Remember, be sure to use UV resistant outdoor rated thread.

I can custom make custom sail ties for you for $.40 per foot plus shipping.  Add 1' to your desired finished length for the loop.  Choose Pacific blue, red, green, yellow, or black.  Email your requirements (# of ties, color, and lengths) to lemonts@ix.netcom.com.  I prefer payment viaPaypal.  I will also accept personal checks, but it will delay your order while I wait for your check to arrive and clear.  Include your shipping address in your order email.   Upon receipt of your email order I will reply with a total including shipping and an estimated shipping date.  I try to complete orders as quickly as possible but may experience delays if my supplier is out of colors I need for your order.

Sail ties should be stored where they don't get tangled are are easily accessible when you need them.  You also don't want to leave them hanging in the sun where UV light could damage them.  Of course they will be exposed to UV while in use on your sails, but why expose them to additional deterioration while they are not in use?   You might store them in a plastic bag, but I found they got tangled when bagged.   I rigged a hook on the magazine rack just inside the companionway hatch on my sailboat.  They hang straight down, are generally out of the way, out of direct sunlight, and yet I or any crew member can easily grab them when I need to secure my sails.  They are out of the way and don't look too bad hanging there.

Ran into an anomaly making colored sail ties.  I found the red webbing was lighter weight and prone to tear, even though I bought it from the same store and he bought it from the same supplier as the other colors.  If you REALLY want red sail ties you might need to double up the webbing and stitch it together but be aware that will make them bulkier, stiffer, and more difficult to use.  Or search around for a more consistent supplier!  Check any material you purchase to make sure it is of consistent thickness and strength.

Tie one on!

COVID-19 -- 1 Year Anniversary

 It has been about a year since we first entered the quarantine stage of the COVID-19 pandemic.  At this time we have experimental vaccines and enough of a decline in new cases that some states are beginning to relax restrictions.  For the first time in about a  year, you might actually be able to go out to dinner at a restaurant!

What does that mean for campers and Rvers?  Well, in the first place camping and RVing and boating often allowed enough social distancing to continue during serious restrictions on other types of entertainment.  Major event venues were virtually shut down as were restaurants and movie theaters.

There have been vaccines from at least three manufacturers made available.   All have been "fast tracked", that is none of them have undergone the complete testing and certification normally required by the FDA.  However, all three have been generally proven to be both safe and effective.  The three I know of are Moderna, Phizer, and Johnson&Johnson.  Moderna and Phizer both require two injections about 3 weeks apart.  Johnson&Johnson is done in a single injection.  Immunity is said to peak about 2 weeks after the final shot.  There have been some reports of reactions to the shots, mostly after the second shot.  Reactions range from the usual sore arm at the site of the injection to fatigue and flu symptoms.  My wife and I, who are both volunteer firefighters and first responders, got our Moderna shots in January as part of the first wave.  We experienced no symptoms after the first shot and only a little fatigue after the second one.  My 96 year old mother got her Phizer shots in March and her only reaction was some redness and swelling around the injection site for a couple of days.  My younger sister also got her Phizer shots in March and did have a mild reaction, but she is unusually sensitive to lots of medications.

One of the benefits of wide-spread vaccination is the creation of "herd immunity".  What that means is the immunity among the population (herd) is sufficient to deter the spread of the virus.  Lacking enough susceptible people to keep growing and spreading, the virus stops spreading.  Herd immunity doesn't mean the virus is completely gone or that someone who hasn't been vaccinated might still get it.  But it is another step back toward normal.

Some states area beginning to relax restrictions.  Here in Oregon kids are going back to school in April and the restrictions on public gatherings are being relaxed.  Restaurants are being allowed to reopen for in-house dining but are limited to 75% of their normal capacity,  Church meetings are likewise able to function at 75%.  It is sure going to nice to be able to go out to dinner again!  Picking it up and eating in the car or having it cool while driving home has not been ideal.

You will soon see some camping venues become available once again.  However, there may still be mask and social distancing  recommendations.  Just having access to some of our favorite campgrounds and marinas once again is cause for rejoicing.

If you haven't yet been vaccinated you should try to get on the list for it.  Until you do you should still take all prescribed precautions.  Also, it takes about 2 weeks after the last shot for the vaccine to become effective.  Even after you have gotten your shot(s) you still need to comply with current government and CDC regulations.

While the number deaths and the overall number of cases of COVID-19 have been daunting, the percentage of who have been tested were positive for COVID-19, according to figures I saw on a government web site was a little less that 6%.  I, for one, am a little surprised and very happy it wasn't a lot more.

So, campers, RVrs, and boaters, get ready to enjoy a wonderful new season of pleasant and healthy outdoor activity,  hopefully with fewer and fewer COVID restrictions as time passes.

Stay safe and healthy!

Tuesday, March 23, 2021

Camper, RV, and Boat Dinettes

Many of our recreational vehicles and vessels have a dinette that provides a comfortable place to sit for meals.  Most of these dinettes are also designed so they can be made down into beds.  Space in RVs, campers, and boats is usually limited so you have to take advantage of every bit of it you can.  Typically, the table is dropped down so it rests between the facing seats and the back rests are brought down to fill in between the seat cushions to make it into a bed.  Dinettes made down into beds are usually about the size of a twin bed (36" wide) but may be as large a full size bed (54" wide).  Lengths may be a few inches shorter than equivalent household mattresses.  Many dinettes are intended for use by children although smaller adults may also find them acceptable.  I am about 5'7", my wife about 5'4", and we've always fit comfortably on dinettes made down into beds in our RVs and campers.  The dinette in cab over truck campers and Class C motorhomes is often more accessible and less confining than the low ceiling of the large cab over bed.  At least you can sit up without bumping your head!  The dinette in our sailboat has a lot more headroom and our feet are less confined than in the "captain's" V-berth (which is only 9" wide!), but we usually use the V-berth anyway.

Dinettes usually include storage beneath the seats.  Sometimes there are doors or drawers on the aisle side of the seat, but some only have access by lifting the panels beneath the seat cushions.  Either way it makes a good place to store items you don't use frequently.  Since the space is usually undivided it is often a good place to store bulky items that don't fit in regular cabinets.  .  If you have to lift the seat to gain access there is usually a finger hole in the plywood base under the cushion you can use to lift the lid.  In one RV I found room under the dinette seat to install an ice chest.  It was a good place to carry extra cold drinks for summer trips.  If you choose to do something like this, make sure you can still get the ice chest in and out easily enough to drain it after each trip.  Or plan on sucking up the water from the melted ice and drying it out after each outing to avoid a nasty mildewed mess.  Oh and don't forget to empty it when you winterize your RV!  Frozen soda cans crack open and made a real mess!

About the only disadvantage to dinettes as beds is having to set them up each night and take them down again each morning so you can use the dinette for seating and eating during the day.  If you use them often you may develop practices and techniques to make setup and take down more efficient.  Using sleeping bags instead of regular bedding may make things a little easier. 

A memory foam mattress topper can make dinette bed more comfortable but you have to have someplace to store it when the dinette isn't being used as a bed and installing it each night and putting it away each morning takes a little extra time.  However, the additional comfort might be worth it.  In addition to extra padding it covers the seams between cushions for a smoother bed.

Dinette upholstery is usually made of rather sturdy materials that will last a long time.   That makes it sturdy, but not always comfortable to lay or sit on.  Dinette upholstery often lasts for decades if it is not abused.  It often comes from the factory with a Scothgard treatment on fabric seats to reduce staining and make it easier to clean  If yours is not Scotchgard protected you can purchase Scotchgard in an aerosol can and spray your seats for extra protection.  Some Scotchgard products help protect the fabric against sun damage as well as water or stains.  Vinyl seats don't need Scotchgard.  If the upholstery is getting worn or is out dated or you just don't like the way it looks you can have it reupholstered or recover the cushions yourself.  Since the cushions are easily removable you can usually just take them out for re-upholstery (unlike sofas, part of which usually can't be removed).  Reupholstering cushions in your boat, camper, or RV is a fairly inexpensive improvement that increases comfort and enjoyment, may extend the usable lifetime of a unit, and might even increase resale value.  If you are at all handy using a sewing machine you might even be able to handle the job yourself!  Sometimes the durable upholstery may be kind of coarse, making it uncomfortable to sleep on.  In such cases you can usually use a mattress pad or even just an extra blanket between your bottom sheet and the cushion.  Lying directly on the coarse fabric can be uncomfortable.

Since dinettes are used for dining, they often get soiled by spilled or dropped food and drinks.  Scotchgard is a good way to minimize the impact of such accidents.  However, if you get a spill before you protect the upholstery with Scothgard or if the spill soaks in or stains the fabric, you will want to clean up the spill as soon as possible, then deep clean it to remove as much of the offending substance as possible.  Greasy foods and things that leave stains can be a challenge.  I usually keep a can of carpet spot cleaner in my RV and boat that I can use for cleaning upholstery as well as floors.  First, wipe up as much of the spill as you can without spreading it around and making the stained area bigger.  Then spray on a generous amount -- but not too much -- of carpet cleaner and let is stand according to the directions on the can, usually about 10-20 minutes.  Then scrub the stain with a stiff brush, wipe it down with damp cloth to remove residual cleaner and removed dirt, then dry it with a soft dry cloth.  Really bad stains may take several tries to get things really looking good again.  One word of caution:  pay attention to how hard and how long you scrub and stop scrubbing before you cause additional damage to the fibers!  A discoloration isn't nearly as bad has having a badly worn spot!  And worn spots are usually more susceptible to getting dirty.  You will always want to make sure the cushions are clean before you turn the dinette into a bed.  Sleeping on spilled food is certainly no picnic!

Another option for worn out cushions is to replace them with used cushions from another vehicle or vessel.   Cushions from the same make, model, and year will be most likely to fit properly but often you can simply measure your cushions and find others that will fit close enough, giving you far more options.   Some good online places to look are ebay.com and craigslist.org.  You might even find some at garage sales, thrift stores, or junkyards that handle RVs.

In a worst case scenario you can make new cushions or have them made.  You just need to get the proper measurements.  Many times you can use the old cushions as a pattern but if they are gone or too badly damaged, measure where they go and purchase foam pads to fit and then cover them or have them covered.  If the old cushions weren't thick enough you can sometimes make new ones using thicker foam, but make sure everything will still fit.  When choosing new fabric for your cushions, look for sturdy material that will hold up in regular use.  If it doesn't come with a fabric protector, spray it with Scotchgard before every using it to reduce soiling and make it easier to clean.  You may want to color match the new fabric to coordinate with other furniture or you might want to change the color just for fun.  If you can't get an exact match you might consider using a complimentary color or fabric.  When choosing a new material you might want to consider vinyl if you have small children.  It doesn't absorb spills and is easy to clean.  For a more comfortable bed, or just seating without the sweat vinyl can induce, go for a nice, sturdy, coarse weave fabric.  While some heavy canvas and nylon materials may be suitable you will usually get the best results using fabric designed for upholstery use.  If you are doing cushions for a boat where you may use them outside in the cockpit, using a UV protected  and water resistant fabric is advised.

Sometimes you can borrow the cushions from your dinette and use them on benches outside to make sitting outdoors more comfortable.  If you choose to do this, take care to keep them out of the dirt and away from campfires and make sure they get back where they belong when you are finished.  You might be able to use cushions from your boat cabin in the cockpit, but often they will not have the same water resistant covering as cushions designed for cockpit use so they might be more easily saturated.  Indoor cushions may also be damaged if left in direct sunlight too long.  Outdoor cushions should be made of UV resistant material.

Not all factory dinettes are designed to be made into beds.  However, if you need the extra sleeping space you can often adapt your existing dinette.  Typically you will need a shelf of some sort to fill the gap between the seats facing each other.   If you are lucky, the table might be used for the shelf.  For an even surface beneath the cushions install a cleat on the front of each seat so hold your added shelf even with the top of the bench the cushions sit on.  You can probably use 1/2" plywood or OSB.  If the gap between the seats is so long 1/2" shelves sag, use 3'4" shelving.  The thinner plywood will save weight in your rig and be lighter and easier to handle.  Very often the existing cushions can be re-positioned to make the mattress.  If not you can buy or make additional cushions or even use pillows to fill in any gaps to fit better.  For even more comfort add a memory foam mattress pad to cover the whole bed.

Many dinette tables include cup holders.  They are particularly helpful when the vehicle or vessel is in motion.  If your table does not have cup holders they can usually be added fairly easily.  First make sure there aren't extra structural supports where you want to put your cup holders.  You can buy cup holders to install in your table just about anywhere RV parts are sold.  You will need to cut a hole in the table the size of the cup holder.  It is best to use a hole saw to do this as cutting out a hole with a jig saw doesn't always make a perfect circle.  You want the hole to be just big enough for the cup holder to fit into, a tight fit is best.  Most people glue the cup holders in place but if you have any reason to remove them you could leave out the gluing.  One reason you might need to remove them is if they interfere with the way the table fits when the dinette is made down into a bed.  I have seen cup holders in white, black, and dark brown and they usually come in at least two different depths.  Some come with drain holes, some without.  You may or may not want drain holes.  Cup holders without drain holes will keep some spills from dripping onto the floor but they may be a little harder to clean.  I made sure I got cup holders without holes when I installed them beside the cockpit on my boat so they wouldn't leak into the cabin below.  They fill up with rain but it is pretty easy to  empty them out for use.   If you can only find solid cupholders but want drains you can always drill a few holes in the bottom.

Dinettes in cab-over campers and Class C motorhomes may offer more comfortable temperatures than the cab-over beds.  They are usually near large windows, not so close to the ceiling, and generally have better air flow, giving them more stable and controllable environments than the small, enclosed, dead end cab-over spaces that can be too warm in summer and too cold in winter.  Some older truck campers have convection furnaces with no fans and getting heat up into the cab-over bed can be spotty.  Sometimes the rising heat makes it too warm, sometimes the heat from the furnace in the far end of the camper never seems to reach all they way up there.  In such cases using the dinette for sleeping space is often way more comfortable.  Many of the problems with cab-over beds are also found in the V-berths on boats, making sleeping on the dinette an attractive option.

Sit this one out!

Monday, March 22, 2021

Boating Safety

Boating safety includes proper operation, obeying rules and regulations, and having the right safety equipment on board and knowing how to use it.   The first two are things YOU have to do is to learn how to and be willing and able to correctly perform all necessary tasks before operating a boat yourself.  The right safety equipment is specified by USCG regulations and boats operated in regulated waters MUST carry the required safety equipment.  Boats operated on non-regulated waters, usually small lakes and rivers, SHOULD carry the same safety equipment and local laws may require it.  Not having the prescribed safety equipment could subject you to significant fines if your boat gets inspected by law enforcement and costly liabilities if you are involved in an accident and didn't have the required, up to date safety items on board at the time.  Of course, just having the right equipment isn't enough -- you (and everyone on your boat) needs to know where it is located,  how to get it out and how to use it.  When you have guests, take a little time to go over safety procedures and make sure they know where their individual life vests are and where all safety equipment is located and how to use it.

Learning proper operation of your boat usually involves more than a few minutes of instruction by the dealer or person you purchase (or rent) your boat from.  Ideally you should have hands-on training by a qualified instructor.  In some cases, such as piloting commercial boats, you must have a Captain's License that has minimum training and testing requirements.  If your boat is for personal use you won't need the License, but you should still ensure you are qualified to operate your boat before you take it out on the water without a more experienced skipper on board.  The training you need will depend on what type of boat you are in.  Personal boats, such as canoes, kayaks, and row boats are pretty simple but you still need to know how to use them safely.  That would include how to launch them, how to load them, how for you and any passengers to sit safely, and how to paddle them, steer them, stop them and dock them.  Motor boats will require additional instruction on how to operate the controls along with guidance on choosing a safe speed and other operational considerations, depending on where you are.  Sail boats will require you to know points of sail and how to raise, lower, and adjust and trim the sails.  Many sailboats also have auxiliary power which you will also need to know how to use.  Operating any boat without proper training is a recipe for disaster, for you and anyone around you!  For personal use you may be able to get training from a friend or associate who is an experienced, competent boater.  If you are renting a boat, pay close attention to the instructions you receive from the rental office.  Take time to clearly understand what they tell you and then comply carefully.  Make sure you are understand and are comfortable with all the aspects of operating a boat before you attempt to do so on you own.  Waves are almost a constant feature you need to know how to handle.  In general it is best to cross waves about 45 degrees to their shape.  Hitting one straight on can cause violent pitching and the rudder and propeller may be lifted out of the water leaving you with no control.  Letting one strike the side of your boat will cause it to roll side to side and if the wave is big enough may make you capsize.  The same applies to the wake kicked up by other boats.  Low waves and small wakes are not usually of any concern, but as the grow bigger they can wreak havoc.  I was once towing a water skier when a harbor tour boat came by kicking up a 2'  wake.  My skier caught the tip of his ski in the wake and it flipped and spun him like a top!  I've heard of small boats capsized by the wake from larger boats and it is not unusual for that to happen.

Certain navigation and other lights are required on any boat used after dark.  Standard navigation lights include a red light visible from the port side, a green light visible from the starboard side, and white lights front and rear. You can remember which color goes with which side in a couple of ways.  Red is for the port side, just as port wine is red and both port and left have 4 letters.   In addition all boats need to display a white light visible all around when moored or at anchor outside a designated moorage at night.  Sailboats also have to display a white light visible from the front when using an auxiliary motor at night.  Lighting requirements might be different for different sized boats as well as different between power and sailboats.  Check to make sure your boat has all the required lights for its type and size.  Modern LED lights take a lot less power than the old incandescent lights.  This is particularly helpful for anchor lights or other lights that will be used while you are on battery only power.

Day shapes are used on sailboats to let other boaters know if the sailboat is under power or at anchor during daylight operation.  The use of day shapes on inland waters seems to be often neglected, which is a sad thing as it may contribute to unnecessary accidents or close calls.  A sailboat under power should display a black ball shape.  At anchor in daylight hours they should display a black, inverted cone shape.   There are other shapes such as diamonds and combinations of shapes used on commercial fishing vessels and vessels under tow but you seldom see them on personal boats.  The day shapes are always black because other colors can not always be distinguished if the sun is in your eyes.  Day shapes are required on vessels over 20m in length and recommended for all vessels and are typically displayed in the fore triangle (e.g., hung from the fore stay).   Day shapes are not commonly seen on inland waters but their use (or lack thereof) may still be a liability factor if there is an accident.

Rules and regulations will, to some extent, depend on where you are using your boat.  Regulated waters usually include all coastal waters and large, navigable lakes and rivers like the Great Lakes, the St Lawrence seaway, the Columbia River, and the Mississippi River.  The regulations governing these waters include federal laws and regulations put forth by the U.S. Coast Guard.  There are other local rules and regulations that govern recreational boating on lakes and rivers.  It is your responsibility to learn the laws, rules, and regulations pertaining to whatever venue you are operating in.  Failure to do so could result in serious accidents or expensive fines.  You will find speed limits and restricted areas posted near most boat docks, launch ramps, swimming areas, brides, and dams in both regulated and unregulated waters.  Obeying these rules is both your legal obligation and a matter of common courtesy and safety.

Safety equipment requirements are primarily based on US Coast Guard regulations.  In pretty much all cases you are required to have personal flotation devices (i.e, life vests) readily available and accessible to every person on a boat.  As boats get larger they are required to have additional throwable flotation devices (specially designed cushions or life preservers).  All boats are required to carry visible and audible signalling devices.  In regulated waters you are required to carry signal flares.  Boats operated after dark require navigation lights.  All boat having motors must carry at least one fire extinguisher.  Boats over 25' must carry at least 2 fire extinguishers.  All safety equipment should be up to date and easily accessible by the crew.  Everyone on board, especially crew members, should know what and where every piece of safety equipment is and how to use it.

Signal flares come in several forms.  There are hand held flares and flare guns.  Flare guns shot the flare high into the air so it can be seen from long distances.  Hand held flares can only be seen by people with a direct line of sight to where you are.  Hand held flares are probably adequate for use on inland lakes and rivers but I would want to have a flare gun if I were doing any off-shore, blue water voyaging.  Signal flares are not cheap and they come with an expiration date.  Some expired flares might still work, but do you want to bet your life on that?  I don't!  Expired flares do not meet USCG regulations so having expired flares might result in a stiff fine, not to mention they very well might fail when you need them most!

Having the required safety equipment on board is just the first step.  Obviously you must also know where to find it and how to use it!   Having all the required equipment tucked away in a storage locker might avoid fines but it isn't going to do yo much good if you need to use it.  Even simple items like life vests require a certain expertise to be worn correctly.  Putting one on wrong could cost you your life!  Throwable cushions are pretty simple to use but it is advisable that you practice throwing them so you will be able to get them where you need them if someone falls overboard and needs help.  Know how to ignite or shoot your flares.  You should not fire flare guns as practice, except in an official USCG designated flare practice area so you may have rely on learning the instructions and "dry firing" practice.  Any passing aircraft that sees a flare is obligated to report it which would launch a possibly expensive search operation. 

Audible signals (horns and whistles) have specific meanings you need to know.  They are generally divided into short and long blasts.  Short blast is 1 second.  A long blast is 4-6 seconds.  One short blast is used by boats approaching each other to signal they are passing on the port (left) side.  Two short  blasts mean passing on the starboard (right side).  By the way, the generally accepted practice is to pass port to port, just like driving on US highways.  Three short blasts means your engine is in reverse.  Five short blasts mean danger or I do not understand or agree with your signal.  You might use 5 blasts to warn an approaching boat that you have a swimmer in the water on the side he intends to pass on or if there is some danger such as rocks or debris  or another boat there.  Audible signals are also used in times of reduced visibility, such as fog or around blind turns.  One long blast means entering or exiting a blind turn, nearing an obstructed area, or leaving a dock or berth.  One long blast every two minutes is used by power boats operating in low or restricted visibility,  One long blast followed by two short blast  is used by boats under sail operating in low or restricted visibility.  Whey would power and sail boats use different signals for the same situation?  Well, sailboats may not be able to change course or speed as quickly as power boats.  Knowing a sailboat is approaching in limited visibility conditions lets you prepare to allow more time for evasive maneuvers if they are needed.  It may also help that you know you will not be able to listen for approaching engine noise and that the other boat could appear out of the fog without you ever hearing the sound of their engine.

EPIRBs (Emergency Position Indicating Radio Beacons) are required on large boats (typically over 300 tons) but might be useful on smaller craft if you are sailing off-shore.  They send an SOS signal that includes your precise coordinates to assist rescuers in finding you.  They are somewhat large and expensive.  A Personal Locator Beacon (PLB) performs a similar function.  They are small enough to carry in your pocket (they are designed for hikers) and start at prices much less than EPIRBs.  Emergency beacons are probably not needed on inland waters but I wouldn't want to do any ocean voyaging without one.  You might want to have a PLB you can use both on land at and sea, for hiking, riding OHVs or horses, hiking, boating, etc.  Most PLBs are waterproof down to at least a couple of meters.

There are no laws or regulations I know of that specify proper clothing for boating,  other than perhaps laws regarding public nudity.   However, to be safe and comfortable you should dress appropriately when boating.  Avoid exceedingly loose clothing that might get caught on parts of the boat.  For both your own safety and to protect the deck of the boat, wear soft-soled shoes with a good grip.  "Real" boaters wear deck shoes when on the boat and do not wear them off the boat where they could pick up bits of debris that would damage the deck.  Slick or loose shoes may cause you to slip and fall, perhaps even fall overboard!  Wearing any shore worn shoes on your boat risks damaging the surface of your deck.  It is popular to wear swimsuits or shorts when boating but be aware you may be exposing your skin to excessive UV radiation which could lead to sunburn and eventually even to skin cancer.  You will get exposed to sunlight reflected off  the water as well as from directly overhead.  Wear sunblock on exposed skin.  A good broad-brimmed hat or at least one that shades our eyes will be helpful.  Your eyes will also need protection from both direct and reflected sunlight so a good pair of sunglasses is advised.  Most tasks on a power boat don't require gloves, but many tasks on a sailboat or any kind of paddle boat will require gloves to protect your hands from blisters, rope burns, and other injuries.

If your boat is on a trailer you will need to have safe towing skills and learn how to launch the boat.  To launch the boat back the trailer down the launch ramp until the boat is in the water.  If you can't get it far enough down the ramp before the water is high enough to get the brakes on your tow vehicle wet you might need a hitch or tongue extension to give you further reach.  Boat trailer guides are really useful when backing the empty trailer into the water to retrieve the boat and they also make it easier to align the boat to the trailer.  When towing a boat, always make sure the boat is securely attached to the trailer and that the trailer hitch, safety chains, wiring, lights, and brakes are working properly.  When towing you usually need to travel slower than you do without a trailer and give yourself more room for turning and stopping.  Trailers can also be affected by wind or gusts from passing trucks and buses.

You will need to know how to safely move your boat out of its slip and how to dock it again when you return.  There are many Youtube videos that can teach you useful techniques.  In general you need to make sure you have untied all dock lines and made sure the lane you are entering is clear of other boats.  When returning, approach the slip/dock slowly, have your boat hook ready to help guide you into the slip, and have your docking lines ready to secure the boat once you are in place.  There are techniques that use spring lines to help position the boat and stop it when docking, but not all boats have spring lines.  Speed in any marina or anchorage is always limited.  You usually only need to run the motor at idle when docking.  Boat trailer guide posts are useful for positioning your trailer and aligning the boat to the trailer.

Once you are out on the water you need to maintain situational awareness.  That means you need to be constantly looking around you, watching for other boats, swimmers, obstacles, or even disturbances on the water that might indicate a problem.  Also keep an eye on the sky for changes in weather.  Adjust your behavior depending on what you see around you.  Watch your speed.  There aren't a lot of speed limits on the open water, but there are definitely speed limits near marinas, boat ramps, swimming areas, bridges, dams, and other points of interest.  You should also slow down whenever there are other boats near by, to give yourself time to react if one of them suddenly darts into your path.  In general power boats are expected to yield the right of way to sailboats but if you are in a sailboat, don't count on it!  If you are in a power boat, do your best to comply.  Boats should pass each other "port to port" (i.e., left side to left side).  Think of it like two cars going opposite directions on the highway.  By the way, you can remember that "port"is the left side because both words have 4 letters.  You can also remember the port light is red, just as port wine is red.  The right side of a boat is called "starboard".  The port side is so named because that was the side boats usually docked on in port.  Starboard is thought to have come from "steerboard" at a time before boats had rudders and were steered by a board usually from the right hand side as the one steering the boat faced forward, probably because most people are right handed.

Two special situations to consider when boating:  cooking and sleeping.  Cooking on a boat can be difficult, especially if you are underway or anchored where there is significant movement.  You will always need to ensure adequate ventilation to eliminate fumes from cooking and from burnt fuel AND to make sure YOU have enough oxygen to breathe.  Even if your stove doesn't put off toxic fumes it will consume oxygen.  You will also need to take care to make sure pots and pans don't slide off the stove if the boat is rocked.  Use pot restraints or hold onto the handle to prevent accidental spills if you are hit by an unexpected wave or wake.  Sleeping on a boat is usually pretty safe, but you may be sleeping in the V-berth.  The mattress at you shoulder could be as wide as a queen size bed while the foot may be as small as 9"!  In smaller boats you will have limited head room so you may need to exercise caution when attempting to sit up.  The rocking of the boat may cause problems for some people.  If you find yourself getting nauseous you may need to take some Dramamine to counteract the affects of sea-sickness, especially when you are trying to sleep.  You will want to ensure you have adequate ventilation so leaving a hatch slightly open is often a good idea, even if it is cold outside.  If you have any kind of heater that burns fuel adequate ventilation is an absolute must since combustion consumes oxygen.  Of course you will want to make sure your boat is securely anchored or tied to a dock or mooring before you retire for the night.  Any boat with overnight facilities should include sanitation.  Be sure you know how to locate and how properly use the available facilities.  Mis-use can result in unpleasant and unsanitary conditions on the boat and sometimes in the water around it.

Passenger safety should be one of your primary concerns.  Perhaps your first option is to make sure your passengers are capable of following safety protocols and looking after themselves.   During one of our sailboat outings we witnessed a power boat accident in which an elderly lady fell overboard.  They got her out of the water quickly but she apparently had a heart attack and even CPR by the local fire department medics couldn't save her.  Ironically, she didn't like going out on a boat in the first place and her family had talked her into it.  Always show passengers where all the safety equipment is located and how and when to use it.  Make sure children and other possible at risk passengers ALWAYS wear their live jackets.  Avoid carrying passengers who are intoxicated or under the influence of drugs, even prescription drugs if the drug affects their senses and/or reaction time.  Try to keep an eye on your passengers and advise them if/when they are doing anything that might put them or anyone else at risk.  If all else fails and your passengers do not cooperate, head back and park the boat and ask them to disembark.  Going back and/or asking people to leave may dampen spirits but not as badly as someone getting hurt!

Be safe and have fun!

Wednesday, March 17, 2021

Additional OHV Body Armor

OK, you've got your helmet and googles, riding boots, gloves, and good riding pants and jerseys.  What more could you need?

Well, there are several more pieces of body armor available to provide additional protection for when you and your ride part company.  Let's face it:  anytime there is a contest between your soft body parts and hard rocks, pavement, or even grass, dirt or sand, your body parts are going to come in second place, and that is NOT a good place to be in that situation!  I had friend who liked to remind me that second place was first loser!  Even landing on soft sand or grass can deliver nasty bruises, friction burns, and abrasions. 

Kidney belt would be next my on my list.  This is an elastic band about 8" wide you wrap around your midsection.  As indicated my its name, it covers your kidneys.  Kidney belts usually have some reinforced bands to give extra protection to your body and your organs but they also provide extra back support that helps you maintain a good riding posture and minimizes muscle fatigue that leads to an aching back.  It even helps hold your tummy a little flatter.  Once you've worn a kidney belt you will greatly appreciate the extra support it gives and will feel somewhat undressed and vulnerable without one.    Kidney belts also have the advantage of holding and supporting your abdomen.  The heavy material along with the stiffeners provides a lot more support and protection than a shirt or jersey.  I know riders who wear a chiropractic back brace under their jersey in lieu of a kidney belt.  It provides the same basic support but usually lacks the extra protection of the stiffeners in motorcycle kidney belts.  The extra support of either a back brace or kidney belt helps keep your organs from bouncing around on bumpy trails and minimizes spinal movement for greater comfort and less fatigue.

                                            Image of The Original Gold Belt Professional Motorcycle Kidney Belt

Then I would go for a chest protector.  Chest protectors are made of sturdy plastic and basically surround your rib cage.  It might better be called a torso protector because it protects your back as well as your chest.  Some early models, often called Rock Jackets, pretty much ended there but modern versions usually include shoulder pads that cap your shoulders and pieces that even guard your collar bones  Some riders prefer the rock jacket style because the extra collar bone and shoulder protection sometimes gets in the way of turning your head in a full face helmet, but I have found the slight inconvenience well worth the extra protection.  That might be because my full face helmet once judo chopped and broke my collar bone in an accident when I was wearing a rock jacket style chest protector.  Chest protectors are well ventilated so there usually isn't very much of a heat penalty to pay when wearing them.   They might even provide some shade against direct sunlight.  I added a D-ring near the bottom of one side where I can attach a fireman's glove strap to keep track of my gloves when I stop along the trail.  I also add a piece of velcro to the center and a matching piece to the bite valve on my Camelbak hydration pack so I can attach the bite valve where it easy to reach when needed and doesn't easily get snagged on bushes out on the trail.

                                                Thor 2022 Guardian Chest Protector, Black, Medium/Large-Dirtbike Chest Protector

Hip pads are usually part of your riding pants.  Just remember to put them in each time you put on your pants.  They are not bulky nor made of hard plastic, but the added padding goes a long way to cushioning your hip bones against hard obstacles.  Many riding pants also have extra protection in the form of plastic logos or other designs near your hips that serve to absorb and deflect sharp impacts.

Knee pads are, in my mind, almost mandatory.   When riding an ATV or dirt bike your knees are often exposed to brush and your knees are very often the first part of your body to contact the ground in a get off, meaning you strike them at maximum velocity.  Standard, simple knee pads are either strapped to your lower legs or tucked into pockets below the knees of your riding pants.  They include a cup that covers you knee cap and a shin guard that extend down your leg into your riding boots.  For even better protection go for professional knee braces.  While they can be quite expensive, the extra protection they provide is well worth it.  If you have had any previous knee injuries or weakness in your knees you should seriously consider getting knee braces.  The are somewhat bulky but you get used to it.  They not only cover you knees put also protect against over-extension and sideways displacement.  Did you know it only takes about 12 lbs of pressure on the side of your knee to dislocate it?  Compare that to the strength of your tibia (lower leg bone), which can typically withstand almost 2000 lbs downward force before snapping!  Knee braces can help prevent sideways displacements and over-extension, saving you from a very extensive and painful injury.  Knee pads are shown on the left, knee braces on the right

Movable Knee Shin Guard Pads 3 Sections Adjustable Breathable Knee Pads Protector Armor for Motorcycle Cycling Racing Long Leg Sleeve Gear                                                                  Image result for dirt bike knee braces photo

Elbow pads aren't as often seen on off road riders but I have found them to be very valuable.  Your elbows, like your knees, tend to be among the first body parts to strike the ground during an accident.  You know how it hurts when you bump your elbow!  Like knee guards, elbow guards extend below the joint providing protection for your forearm as well.  Coupled with the shoulder pads on a comprehensive chest protector, your arms are nearly covered completely, which can save you a lot of scrapes and abrasions and a lot of pain and spilled blood.  Some riders find them too warm on hot days, but I have always felt the extra protection was well worth the slight discomfort.  A friend of mine who was a seasoned desert racer, used to joke that if you went over the handle bars you should wave your hands in front of you to clear the debris away from your landing spot.  Wearing elbow pads will do a lot better job of protecting your forearms and elbows from injury.

                                                   Image result for dirt bike elbow pads photo

All in one body armor is available that combines kidney belt, elbow pads, and chest protector with a riding jersey so you can put it all on at once.  It may make getting dressed and undressed a little easier but I prefer the added protection of individual pieces of armor.  Slip on armor usually doesn't include the shoulder and collar bone guards found on state-of-the-art chest protectors, but it does cover chest, spine, kidneys, elbows and shoulders.

                                                   Image of Motorcycle Full Body Armor Protective Jacket Guard ATV Motocross Gear Shirt Black Size L

Bandanas aren't exactly body armor, but they are a good thing to include in your riding outfit.  They do protect your neck from and wind burn.  I roll mine up, soak it with water, and tie it around my neck.  That does two very valuable things:  it protects my neck between my jersey and helmet from sunburn and it helps keep my cool as the water evaporates.  There are some major blood vessels fairly close to the skin in your neck and the wet bandana helps cool your blood going to and from your head, which helps keep your whole body more comfortable in hot weather.   Bandanas can have other uses too.  You can wear them bandit-style over your face to protect your nose and mouth from dust when riding exceedingly dusty trails or caught in a dust storm or to keep your face warmer when it turns cold.  They can also be used for emergency slings and bandages so it is handy to have one conveniently tied around your neck if you or one of your riding buddies needs it. 

Here's an odd suggestion for macho dirt bikers:  wear panty hose!  They provide a smooth, slick layer between your skin and your riding pants and work really well to prevent the dreaded "monkey butt" that often comes from straddling a saddle for hours of off road activity.  Interestingly enough, they also help keep you warmer in cool weather but aren't noticeably hotter in warm weather.  You can buy special underwear to prevent "monkey butt", but panty hose are a lot less expensive and get the job done.  They also help protect your feet against blister in your riding boots.

One more item you might see are neck braces.  They are basically padded devices that fit around your neck between your helmet and your shoulders.  They are intended to help support your head and protect your neck from injuries while riding.  However, many riders avoid them because, like chest protectors (only more so) they restrict head movement needed to maintain a good eye on your environment for safety.

                                                                    Photo


Some riders  avoid various pieces of body armor because they add weight and sometimes increase heat.  However, I have found the added protection more than worth the added weight and any added heat.

In summary, you will find wearing full body armor will help you avoid a lot of injuries and is usually far more comfortable than ordinary boots, shirts, and jeans.  Yes, you will have to put out a little investment, but I am sure you will find it is more than worth whatever it costs.  It is also more than worth any discomfort from added weight or unwanted warmth.  Besides that it looks cool!

Armor up!

Jackets and Coats for OHV Riders

Since a lot of OHV riding is a summertime activity, coats and jackets are not always needed and are often overlooked.  However, if you plan to ride earlier in the spring or later in the fall or especially in the winter, you are going to need warmer riding gear.  And you might need at least a light jacket if you get caught in a summer storm during an outing. I have a compact nylon jacket that folds into its own pocket  and a plastic rain poncho that I tuck into the tool bag on my off road motorcycle in case I get caught in a sudden rain.  On cooler days I wear an Enduro jacket.

Riding coats and jackets aren't as essential a part of body armor as helmets, goggles, boots, and gloves, but when the weather turns wet and/or cold you are definitely going to want more protection!  Being cold and wet is not only uncomfortable, it can be dangerous.  You loose body heat 25 times as fast in wet clothing and can easily become hypothermic even in mild temperatures, especially when you factor in the wind-chill factor of riding an OHV.

A good pair of long johns under your riding pants and jersey is a good first step for really cold daysJust make sure you have enough room for them inside your riding clothes so they don't bind or limit your movement.  You definitely don't want them to chafe!  And you don't want to wear them if  the day is going to warm up.  Dress in layers you can remove, rather than ones you can't!

Another trick is to wear women's panty hose under your riding pants.   A famous football quarterback used to wear them under his football uniform on cold days to keep warmer.  Another benefit that even works in hot weather is they provide a slick buffer between your skin and your riding pants, preventing the dreaded "monkey butt" that often results from straddling a dirt bike or ATV saddle on vigorous rides.  And, while they can keep you warmer in cool weather, they aren't really that much hotter in warm weather.  There are special undergarments designed to prevent monkey butt, but they are a bulkier and lot more expensive than panty hose.

Windchill jerseys are designed for use in cooler weather.  They are kind of like a sweatshirt for off road riding, giving you added warmth and protection from the wind without restricting movement and while maintaining adequate ventilation to prevent over heating.  They usually aren't too warm if the day warms up either.

In colder weather you may need a special riding jacket or coat.  The most popular style for off road use is called an Enduro Jacket.  They are usually made of strong Gore-tex nylon that provides excellent wind and rain resistance and a fair amount of relief from abrasion should you go down.  They are available in a variety of styles and colors. Some have removable liners that make them versatile for both cooler and colder days.  Most are at least water resistant if not waterproof.   They are good option when you know you will be riding in cool or cold weather.  I carry a little nylon jacket that folds into a pocket on its chest to use if I get caught out in an unexpected rain out on the trail.  Any nylon or Gore-Text jacket could be treated with a waterproofing spray like Camp-Dry for additional rain protection.  Enduro jackets usually have several nice-sized pocket where you can carry extra items such as GPSs, phones, maps, lens cleaning clothes, and chemical hand warmers

                                FirstGear Adventure Air Jacket

Leather riding jackets are popular among street bikers.  However, they are usually too heavy and too stiff for most off road riding.  There are some heavy duty nylon winter street bike coats you might be able to use off road.  I have one I used for a while.  One of the things that made it work for me off road was it was about 1 or 2 sizes bigger than I usually wear, giving me enough room for normal riding gear underneath and still having good flexibility and freedom of movement.  It was a good option for really cold days, but for most days I preferred using my Enduro jacket which fit better, was more flexible and more comfortable and with the right layers underneath was perfect.

Of course another standard trick for cold weather activities is to dress in layers.   Having multiple layers keeps your body heat in but also allows you to remove layers when things warm up to you don''t get overheated.  Interestingly enough, getting over heated can also lead to hypothermia as your excess sweat cools you down faster than your body generates heat.  When dressing in layers pay attention to which layers you can remove out on the trail and how you will pack them for transport back to camp.  Using thermal underwear is a good way to stay warm but you usually won't be able to remove it out on the trail if things warm up.  Extra jackets or rain pants over your normal riding gear can be easily removed and tucked away in a back pack when the day gets too warm for them.

One last word of caution:  don't dress TOO warm!  Over-dressing will result in you getting too warm during your activities which in addition to being uncomfortable and perhaps generating unpleasant body odors can cause you to sweat enough to actually make you colder, cold enough to put you at risk for hypothermia.  If you are going to doing any kind of  vigorous activity, even riding a dirt bike or ATV, you should feel just a little bit cool (not cold) standing around before you start out.  If you are comfortable standing around you are probably going to be too warm soon after you start riding.

Stay warm!

Tuesday, March 16, 2021

OHV Riding Pants and Jerseys

Riding pants and jerseys provide reasonably comfortable protection for your limbs and torso when operating an off highway vehicle.  You will see people wearing less specific items like jeans and t-shirts but they are unnecessarily risking injuries that can come from just riding, let alone from accidents.  I didn't have real riding gear for my first few outings and I quickly learned the limitations of jeans and casual shirts.  Jeans and other work pants are not designed for you to straddle the seat of a motorcycle.  You will quickly discover they get tight in very uncomfortable places and lack the flexibility you need for comfort and proper movement on the bike.  Short sleeved shirts will expose your arms to sunburn, windburn, and scratching by brushes or branches along the trail.  Sweatshirts get too warm after only a few minutes of riding on even cool days.

Riding pants are sometimes called "leathers".  That is because the riding pants originally worn by old time motorcycle riders were usually made of leather to provide warmth in cold weather and wind and protection against abrasions when they parted company with their machines.  These days they are usually made of sturdy nylon like Gore-tex, augmented by plastic or silicone protective patches that often mascarade as logos or design elements.  Riding pants are usually equipped with soft hip pads that fasten to Velcro tabs on each hip.  The the better ones include pockets in the lower leg for knee pads that also cover the knee caps and shins.

                                                         FOX Racing Dirt bike Riding pants motorcycle Kids Youth Size 8

Riding pants should fit comfortably and not bind when you are sitting, standing, or walking.  Some have adjustable waists.  Make sure they fit snugly around your waist.  You don't want them loose enough to slip down while walking or riding!

Riding pants are usually made of a sturdy nylon that provides quite a bit of water resistance.  If you often get caught riding in the rain and your riding pants don't keep you dry, wear some rain pants over them.  You might also get extra protection by spraying your riding pants with Camp Dry.

A lot of riders simply wear jeans or sturdy work pants instead of riding pants.   True, it may be cheaper to wear available pants but they won't provide the level of comfort or proper protection of real riding pants.  Even tough "fire hose" work pants won't give you the protection and comfort of good riding pants.  The plastic logos are often strategically designed and placed to provide extra padding and skid protection.   Riding pants are also designed to accommodate knee and hip pads that provide a lot of extra protection when you  part company with your ride.  If cost is keeping you from buying real riding pants you can usually find pretty good prices on used gear on ebay or craigslist.  Because almost no one gets to ride as often as they would like you will often find riding gear in pretty good condition.

Riding "shirts"are called jerseys.  They are usually made of a fairly light and breathable but sturdy material so they can provide some protection against dirt and sand kicked up at trail speeds.  They need to fit comfortably and allow full freedom of movement of your arms.  Some jerseys have built in soft elbow pads to give a little extra protection but strap-on, hard elbow pads will give better protection.  Most jerseys are pretty comfortable in both warm and cool weather.  For cold weather riding, choose "Wind Chill" jerseys, designed to help keep you warmer in cooler weather.

                           Image 1 - Fox Racing 180 Jersey - MX Motocross Dirt Bike Off-Road MTB ATV Mens Gear

You will definitely see guys riding wearing a variety of tops -- t-shirts and even tank tops in hot weather and sweat shirts when it is cooler.  However, once again, these garments do not provide the comfort, flexibility of movement, nor the protection of a proper riding jersey.  Exposed arms and other skin will quickly suffer from sun and wind along with the impact of wind-blown debris out on the trail.  Short term pain and maybe even bleeding or infection is likely along with the long term sun exposure increasing the chances of getting skin cancer.  I know more than one desert racer who developed melanoma from over exposure to the sun.

Riding pants and jerseys were at one time frequently color coordinated to the rider's machine.  While the practice is still fairly common and is a good way to show your support for your favorite brand of equipment, more colorful options have become popular, very likely fueled by the exotic color schemes adopted by Supercross riders over the years.  It isn't unusual to find very macho riders even wearing a combination of pink and chartreuse regardless of the factory colors of their bikes.

Once again, you might get away with wearing jeans and a t-shirt or sweatshirt for a while, but real riding pants and jerseys will definitely be more comfortable and safer.  And it looks way cooler!

Dress right!